Hello there lovely readers!
I have some new nail art to share but before then how's about a bit of a catch up before getting to that...
So...despite the year starting off in not the best of ways with bush fires, apocalyptic storms & of course being hit with a worldwide virus pandemic...I am still determined to try & achieve the goals I wanted to this year, especially after having such a rough 2019. This includes travel (though naturally one is holding fire for now...) better health (I finally bought a bicycle & will be attempting regular cycling when I can!) & one other thing that I have wanted to do for the longest time which is...POTTERY!

Showing posts with label Barry M. Show all posts
Showing posts with label Barry M. Show all posts

4.02.2019
NOTD - Japanese Art Inspired Nails!
Hey there lovely readers!
I'm currently continuing on my creative journey if you will with looking for more challenging & interesting nail art looks. Following on from my previous post I'm finding myself drawn more to artwork these days as inspiration & I've always been intrigued by Japanese art with its serene blossoms & beauty.

I'm currently continuing on my creative journey if you will with looking for more challenging & interesting nail art looks. Following on from my previous post I'm finding myself drawn more to artwork these days as inspiration & I've always been intrigued by Japanese art with its serene blossoms & beauty.
12.24.2018
Festive NOTD - Sweet Sparkly Layered Snowflakes
Hello there lovely readers!
As Christmas is now on our doorstep I thought I'd squeeze in one last festive nail art look for the year! I've actually done better than I anticipated, rolling out 4 different designs: Vintage Gold Festive Roses, Minty Snowflakes, Winter Wonderland Christmas Trees & also a Disney special with some Frozen nails. A little life update also, I handed in my notice this month so I will be starting a new job in the new year which I am very excited about! How that will leave me for time to blog...I don't know yet, but lets see! Blogging has always been so therapeutic for me hence why I've continued at it after so long & its something I definitely strive to continue with!

For my last look I've done another Snowflakes design. However I've gone a different route this time & thus doing so I think I may have discovered my new favourite thing...LAYERED jelly stamping! What on earth is this you ask? Do you happen to have any of those sheer tinted polishes in your stash but no clue how to use or what to do with them? OPI Color Paints were the first of these kind (according to my knowledge anyhoo) & a few brands jumped on the bandwagon shortly after including Barry M with their Lolly Gloss Range which I blogged about HERE.

I decided to use these & my trusty stamper to create this sweet snowflake look & I think this may be my favourite festive design of the lot this year! I got the idea of layering from the fab Kate aka @Alterego_nails on IG. It was she who also inspired me for the Sharpie Nails I did HERE...what can I say, the girls got mad skills & ideas!

To start I needed an opaque base to work on first...as the two Lolly Gloss polishes I have were pink & purple, then those were the base shades I went for as well. For my purple nails I applied one coat of Models Own Roxy & for the pink nails I applied one coat of a fuchsia pink European brand polish I picked up on my travels.

Now for the first round of stamping. I have a few festive stamping plates from Born Pretty Store which also have single snowflake patterns, perfect for this. Using white polish I stamped about 3 snowflakes to each nail.
I then reached for the tinted Lolly Gloss polishes & applied one coat over the snowflakes which gives that awesome "submerged in jelly" like look! Obviously using the purple tint on the purple nails & pink tint on the pink nails. Once this was dry I then went in again & stamped on 2 more snowflakes on top.

You can keep on going with the layering if you wish but I stopped here. For a final touch I added a pretty pink rhinestone to the center of my 2 top snowflakes & though you can't really see I also added a coat of glitter topcoat for some extra powow SPARKLESSSSS.

A final coat of topcoat to seal those stones & add shine & you're done! Thanks again to the fab Kate for this awesome idea. I now need to get hold of more tinted sheer polishes so I can do ALL the layered stamping! Thanks as always for reading darling ones & I wish you the merriest of Christmases whatever you may be doing! See you in 2019!
Lotsa love to ya!

As Christmas is now on our doorstep I thought I'd squeeze in one last festive nail art look for the year! I've actually done better than I anticipated, rolling out 4 different designs: Vintage Gold Festive Roses, Minty Snowflakes, Winter Wonderland Christmas Trees & also a Disney special with some Frozen nails. A little life update also, I handed in my notice this month so I will be starting a new job in the new year which I am very excited about! How that will leave me for time to blog...I don't know yet, but lets see! Blogging has always been so therapeutic for me hence why I've continued at it after so long & its something I definitely strive to continue with!
For my last look I've done another Snowflakes design. However I've gone a different route this time & thus doing so I think I may have discovered my new favourite thing...LAYERED jelly stamping! What on earth is this you ask? Do you happen to have any of those sheer tinted polishes in your stash but no clue how to use or what to do with them? OPI Color Paints were the first of these kind (according to my knowledge anyhoo) & a few brands jumped on the bandwagon shortly after including Barry M with their Lolly Gloss Range which I blogged about HERE.
I decided to use these & my trusty stamper to create this sweet snowflake look & I think this may be my favourite festive design of the lot this year! I got the idea of layering from the fab Kate aka @Alterego_nails on IG. It was she who also inspired me for the Sharpie Nails I did HERE...what can I say, the girls got mad skills & ideas!
To start I needed an opaque base to work on first...as the two Lolly Gloss polishes I have were pink & purple, then those were the base shades I went for as well. For my purple nails I applied one coat of Models Own Roxy & for the pink nails I applied one coat of a fuchsia pink European brand polish I picked up on my travels.
Now for the first round of stamping. I have a few festive stamping plates from Born Pretty Store which also have single snowflake patterns, perfect for this. Using white polish I stamped about 3 snowflakes to each nail.
I then reached for the tinted Lolly Gloss polishes & applied one coat over the snowflakes which gives that awesome "submerged in jelly" like look! Obviously using the purple tint on the purple nails & pink tint on the pink nails. Once this was dry I then went in again & stamped on 2 more snowflakes on top.
You can keep on going with the layering if you wish but I stopped here. For a final touch I added a pretty pink rhinestone to the center of my 2 top snowflakes & though you can't really see I also added a coat of glitter topcoat for some extra powow SPARKLESSSSS.
A final coat of topcoat to seal those stones & add shine & you're done! Thanks again to the fab Kate for this awesome idea. I now need to get hold of more tinted sheer polishes so I can do ALL the layered stamping! Thanks as always for reading darling ones & I wish you the merriest of Christmases whatever you may be doing! See you in 2019!
Lotsa love to ya!
11.22.2018
NOTD - Sweet Candy Florals
Hey there lovely readers!
Y'all know I dig my florals muchly & I have a sweet floral freehand look for you today which is actually the manicure that I wore for my birthday but forgot to share but I was so in love with how it turned out that I didn't want to take it off!

Y'all know I dig my florals muchly & I have a sweet floral freehand look for you today which is actually the manicure that I wore for my birthday but forgot to share but I was so in love with how it turned out that I didn't want to take it off!
11.12.2018
Meebox Review - August 3rd Birthday Pool Party Box!
Hello there lovely readers!
Today I have another Meebox review to share with you. I've blogged about a few of these delightful little box o' nail treats already which you can check out HERE. This time it is the August box (yes its a bit late!) we will be exploring & FYI I also have a bit of an exciting update regarding this fabulous nail service that I have become a huge fan of at the end of this post!

Today I have another Meebox review to share with you. I've blogged about a few of these delightful little box o' nail treats already which you can check out HERE. This time it is the August box (yes its a bit late!) we will be exploring & FYI I also have a bit of an exciting update regarding this fabulous nail service that I have become a huge fan of at the end of this post!
5.29.2018
NOTD - Infinity Stone Nails!
Hey there lovely readers!
So I, like much of the world of late went to see the greatly anticipated Avengers Infinity War, & boy did it leave a mark & then some! I am a huge fan of this incredible universe which I'm sure comes as no surprise. Having said that I DID have to do a bit of catching up with a Marvel marathon or two before going to see this instalment (don't judge me...there ARE a lot of films & I kinda lost track!) & I definitely advise you do as well to avoid any gaps in the story!

So I, like much of the world of late went to see the greatly anticipated Avengers Infinity War, & boy did it leave a mark & then some! I am a huge fan of this incredible universe which I'm sure comes as no surprise. Having said that I DID have to do a bit of catching up with a Marvel marathon or two before going to see this instalment (don't judge me...there ARE a lot of films & I kinda lost track!) & I definitely advise you do as well to avoid any gaps in the story!

5.08.2018
NOTD - Blue China Rose Nails
Hey there my lovely readers!


If you caught a few of my recent posts you will know that yours truly has officially dipped her toe into the world of nail art stamping.
Now whilst freehand nail art will forever remain my first true joy, I do confess I am rather enjoying my venture into the stamping way of life....when said stamping is a success that is!
2.26.2018
Disney Nail Art Series - The Little Mermaid!
Hello there lovely readers!

Ooooh I'm excited to share with you the latest addition to my Disney Nail Art Series as, closely following The Beauty and The Beast, this is definitely up there as one of my favourite Disney movies ever...it is of course...The Little Mermaid!
11.29.2017
NOTD - Creme & Chrome Geometric Nails
Hello lovely readers!

Here is a quick mani I put together where I couldn't decide if I wanted me some vampy, creme or chrome nails...so I decided to go for all three! Go hard or go home right?
7.03.2017
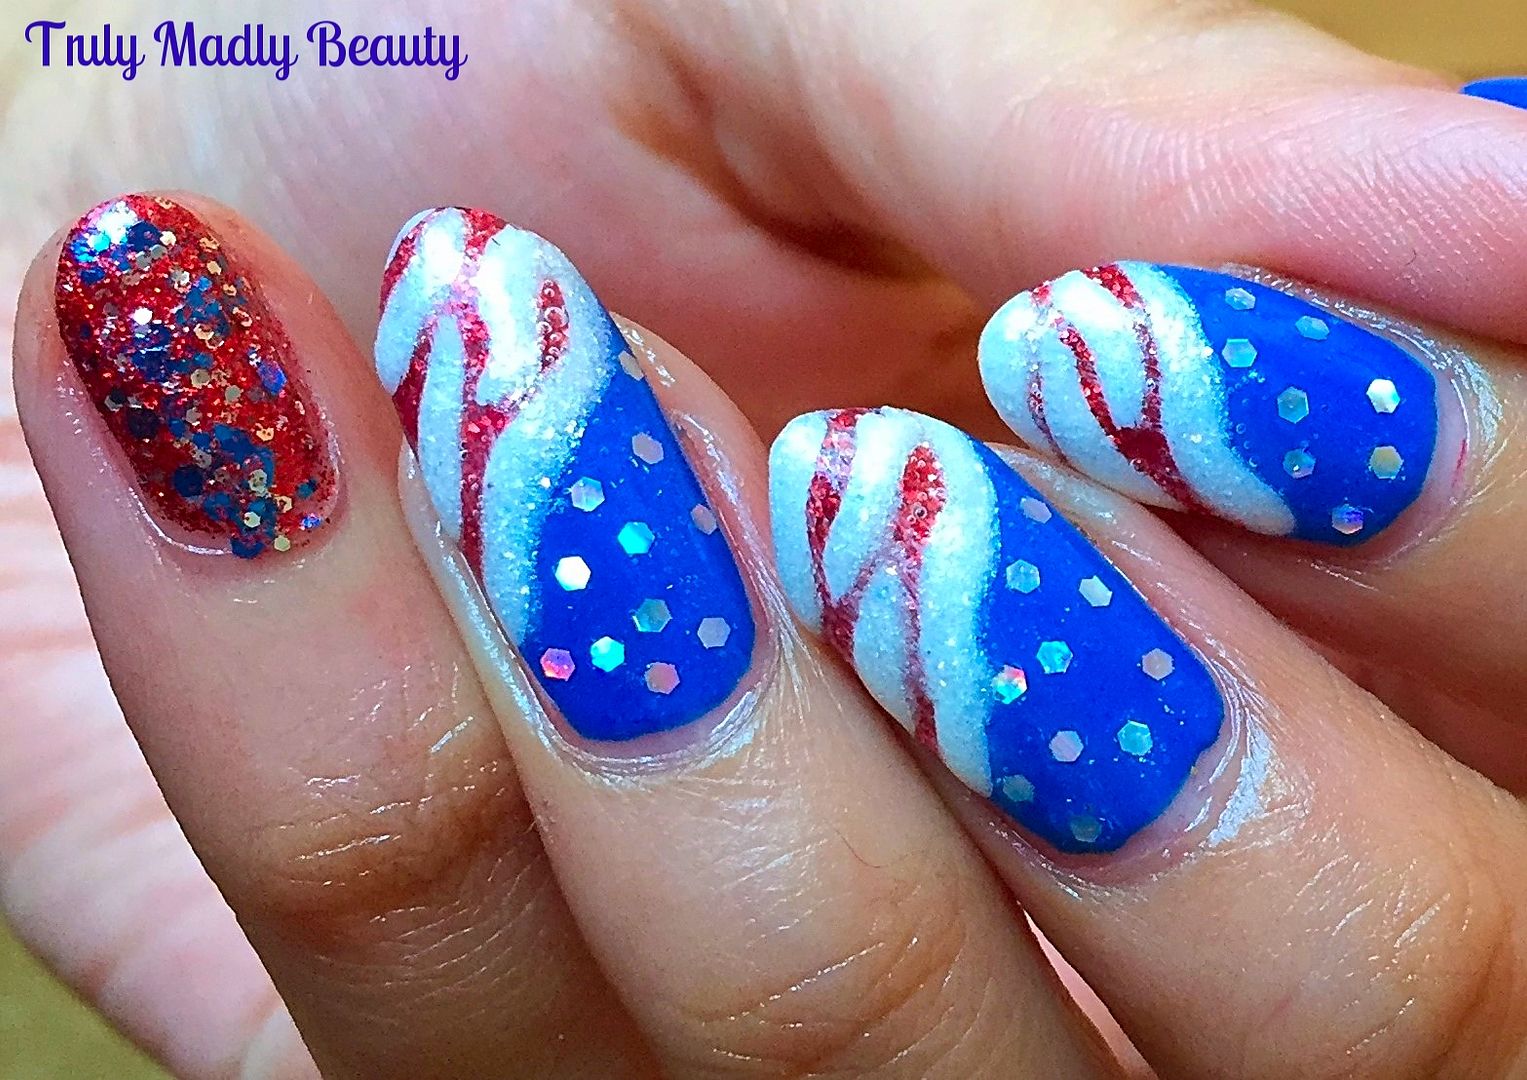
NOTD - Fourth of July Nails!
Hello
there lovely readers!
As
today's nail art has distinct red, white and blue vibes going on I
think its obvious what occasion is inspiration is here ;) Every year
I like to throw together a mani to mark my American cousins over on
the other side of the pond's Independence Day celebrations. Any
excuse to get my nail art on!
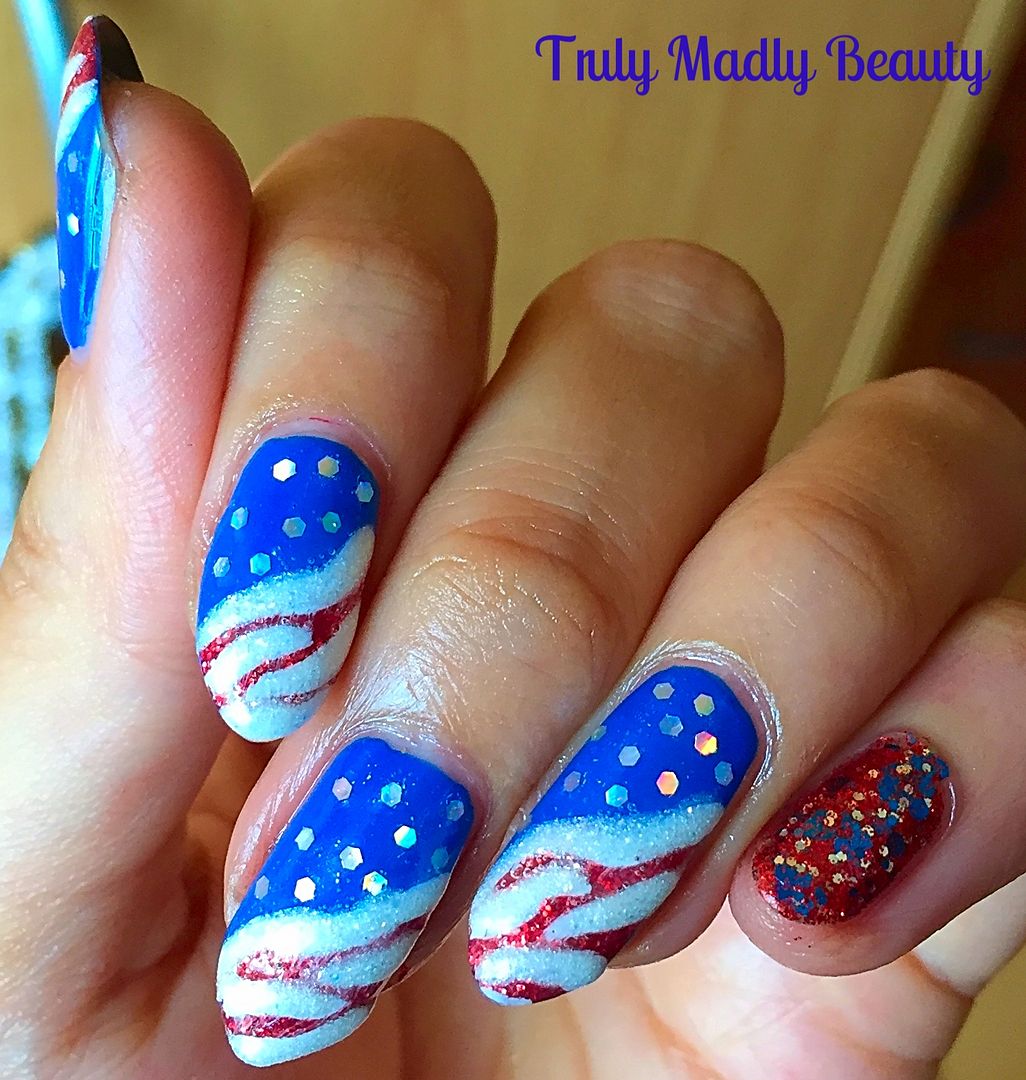
I
was muchos happy with my Fourth of July nails last year which
featured blue dripping glitter & a step by step tutorial so go
have a peek at those HERE. I loved them so much & didn't think I
could top them...maybe it was a mistake to go in with that attitude
as I really wasn't happy with how these ones for this year came out
but meh you win some, you lose some & I'm gonna roll with this
FAIL of immense proportions!
3.16.2017
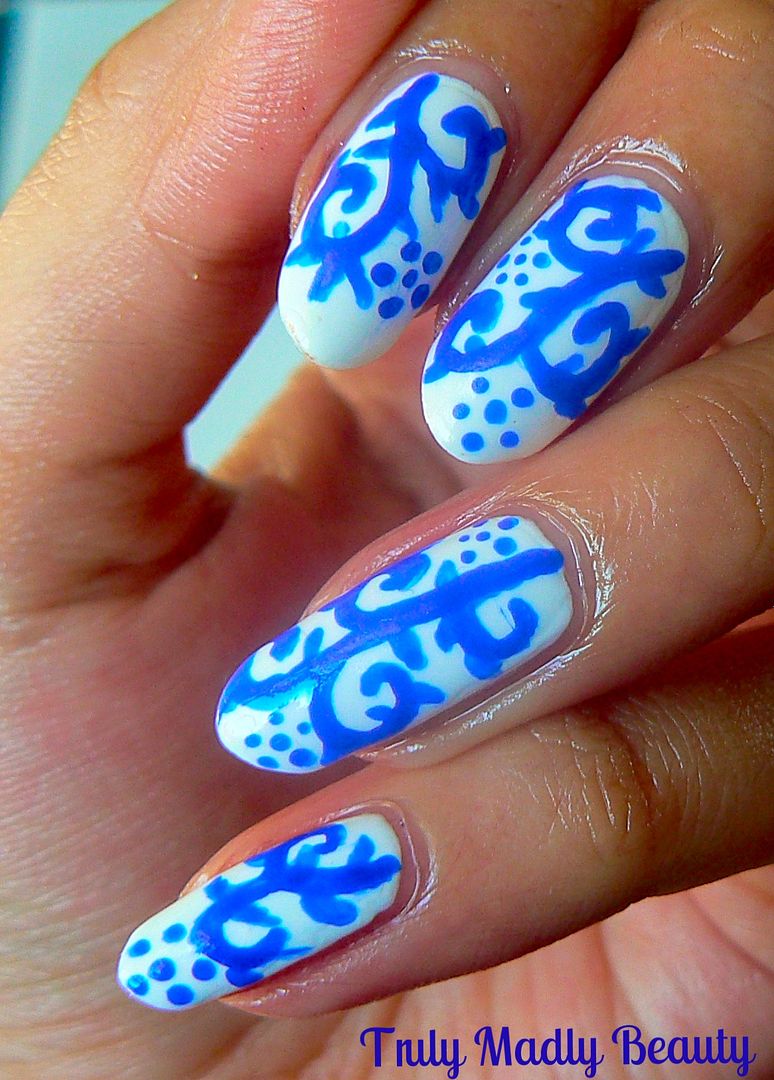
NOTD - Blue & White China Nails
Hello
there lovely readers!
Now
you know how much I adore my afternoon teas, the numerous reviews on
here would be a dead giveaway...One of my favourite parts of a good
tea, other than the food of course, is the pretty crockery used to
partake. Call me crazy (many do) but I do feel a cup of tea tastes
better when sipped from a pretty cup & saucer ;) I adore
intricately patterned teacups & have a somewhat odd addiction you
might say of accumulating said crockery, a habit that drives my
mother bonkers as I guess it ruins the aesthetic of her neatly
ordered cupboards with my random finds. There is a point of me
talking about this topic by the way & that point leads naturally
to my other addiction...nail art!
Many
times I've found myself inspired to create nail art using some of the
designs I've come across on my teacup & saucer adventures.
2.27.2017
NOTD - Gothic Vines
Hello
there lovely readers!
I
was wearing a neutral manicure not too long ago as I had an event to
go to & something low key was order of the day. As much as I do
love a sleek & chic simple nude mani, I probably lasted about a
day after said event before I was already itching to add something to
it haha!
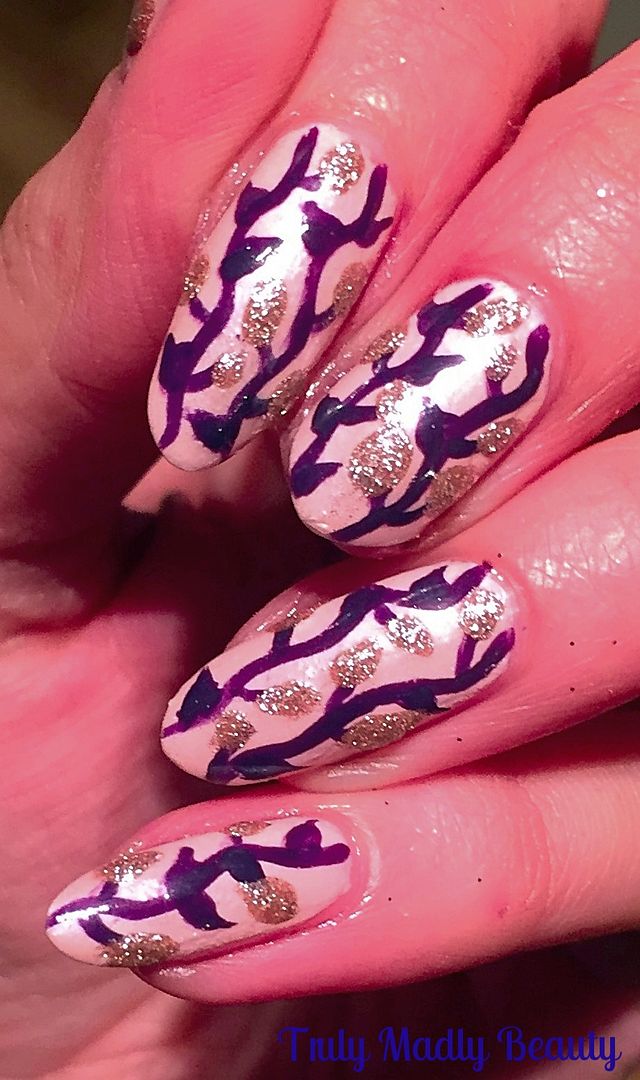
So
to jazz up my nude pink manicure, which was pretty while it lasted by
its onesie & came courtesy of Nails Inc Alexa Chung's collection
polish in Pink Cashmere, a delicate & feminine shimmery pink, I
decided to freehand on a simple vine design.
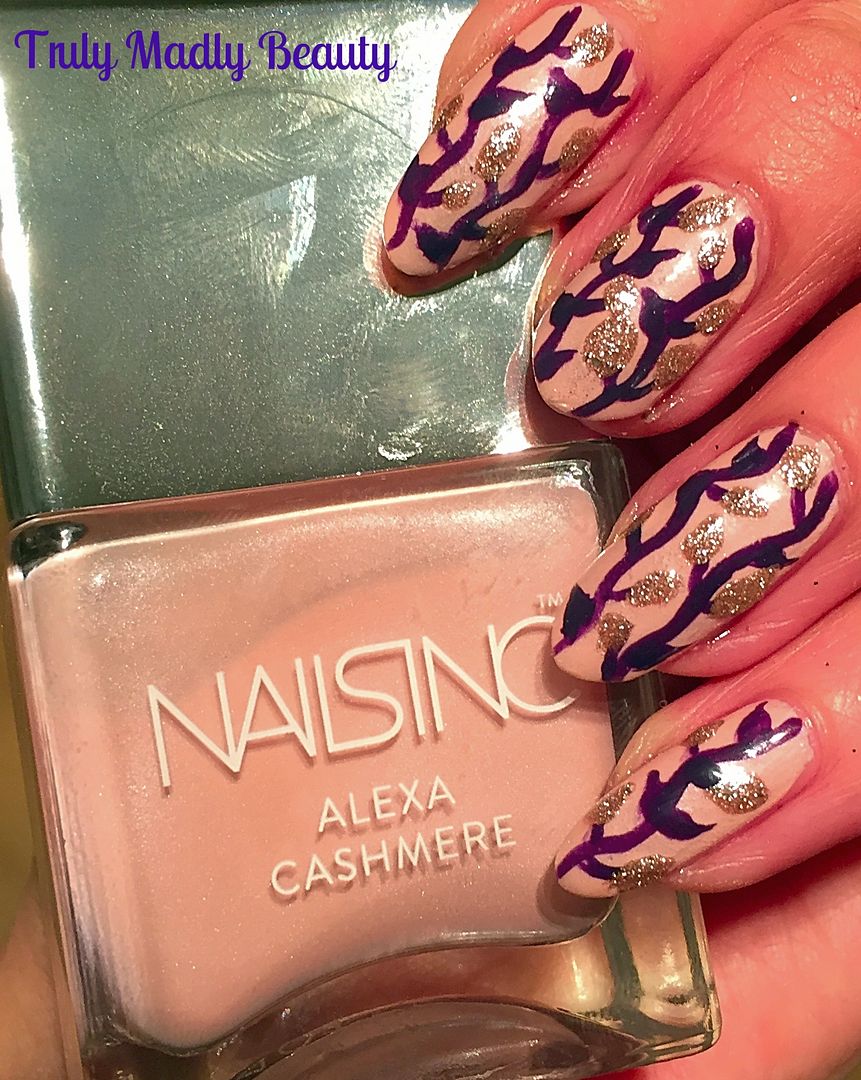
For
my vines I opted to go for a dark gothic purple creme polish from
brand Filthy Gorgeous in the shade Pulp.
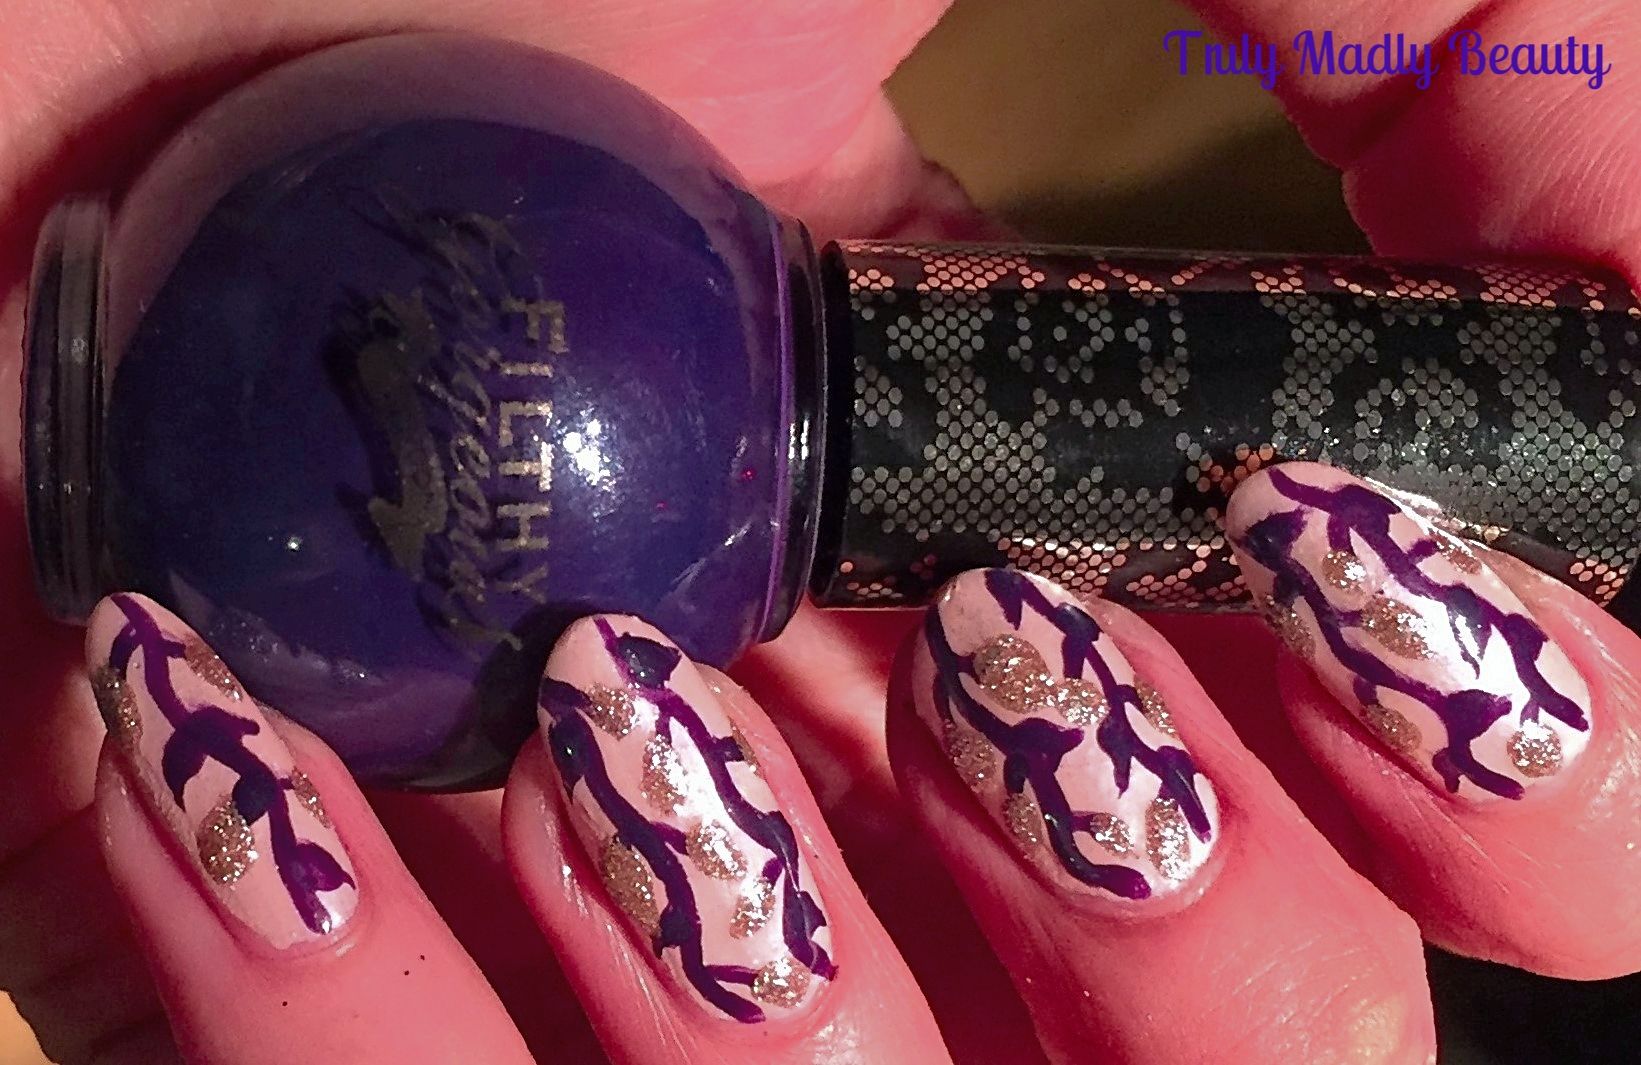
To create your vines is super simple. Using
a fine nail art brush, I first applied two swirly lines vertically
down the whole nail.

Then
using the same brush I just added on some teardrop like shapes for
the leaves to my vines.
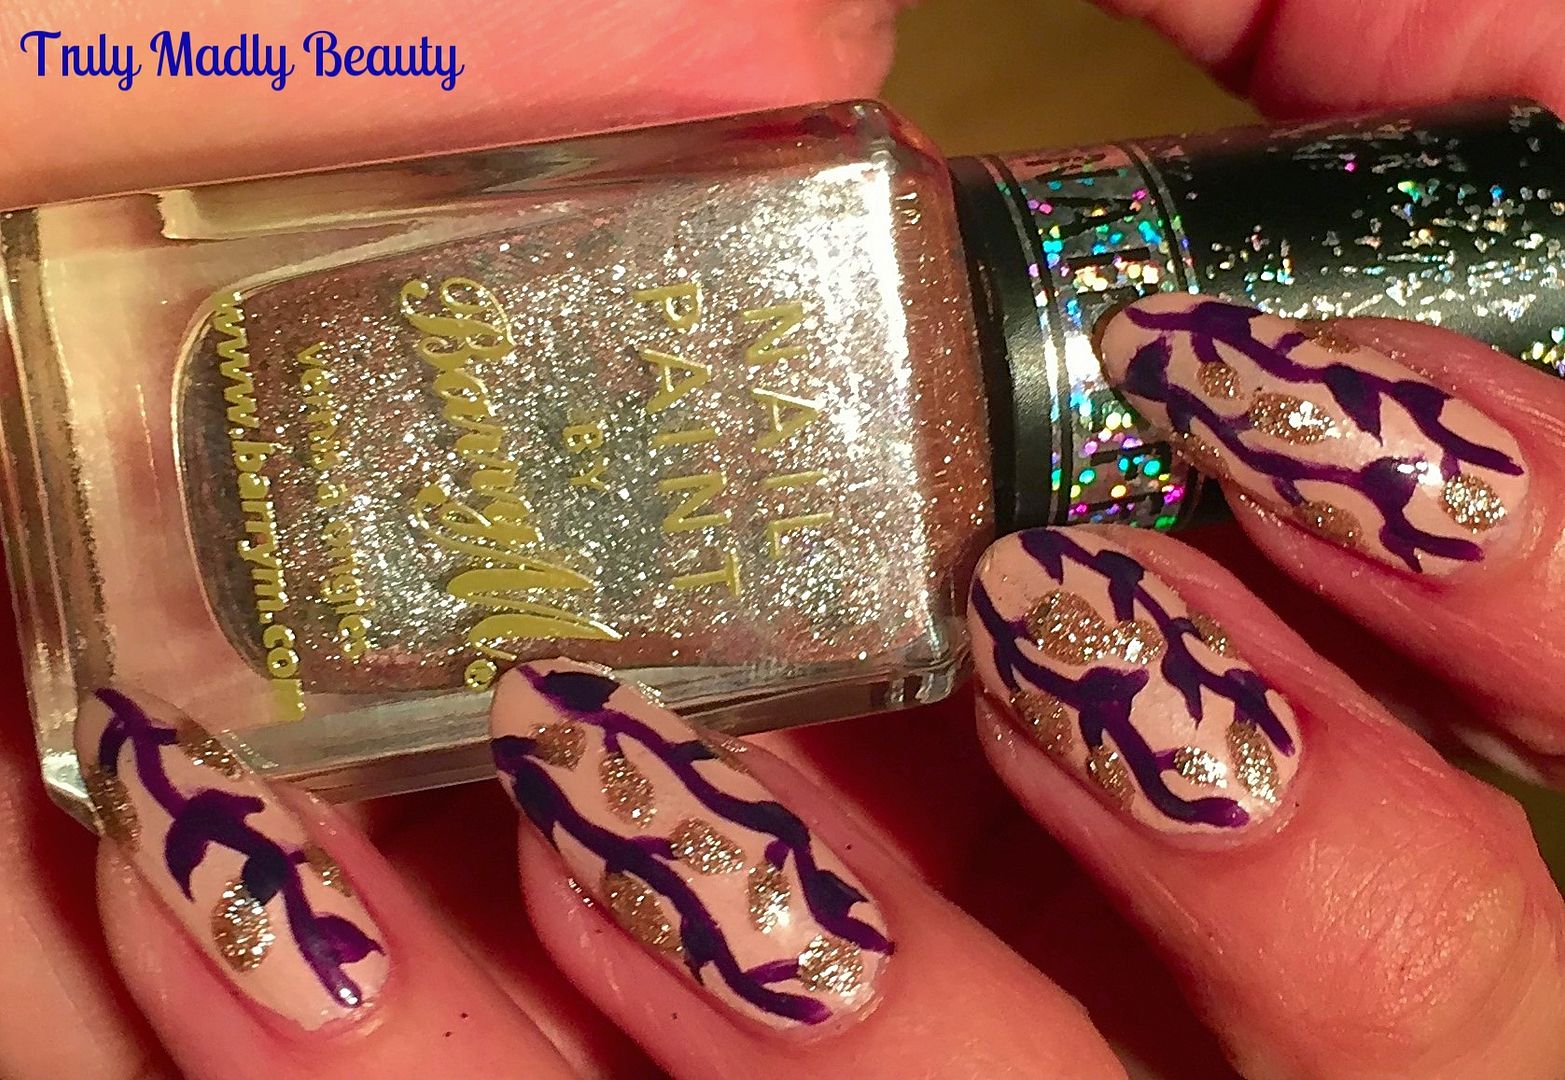
Still
feeling like something a bit more was required I dug out one of my
favourite textured polishes from Barry M in the shade Duchess which
is an almost rose gold chunky glitter, so pretty! I added on a few
sparkly rose gold leaves in between the purple.
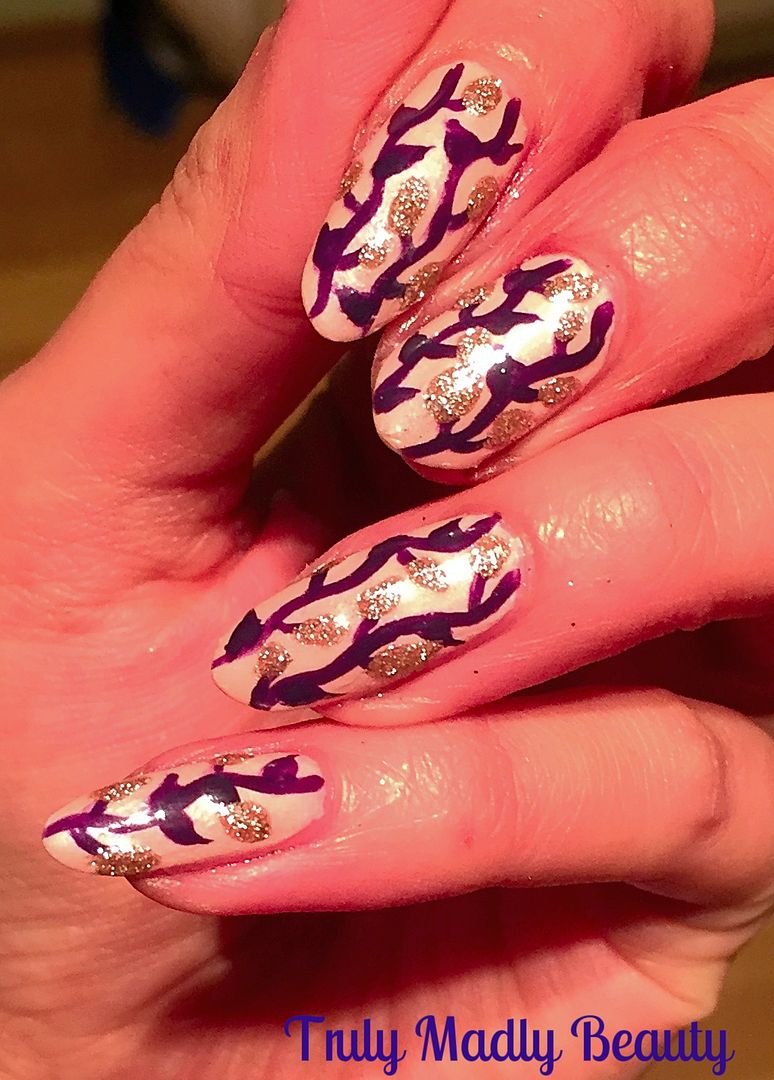
Don't
forget a slick of topcoat to finish. Hope you liked this quick &
easy design to jazz up a plain mani! Thanks for reading!
Lots
of love to ya!
1.02.2017
NOTD - Pastel Winter Wonderland Nails
Hello
there my lovely readers!
Happy
new year to you all my beauts! I hope you all had a wonderful Xmas
break & new years however you spent it. I'm certain my spirit
animal is a bear as I've pretty much spent the holidays in
hibernation which has been utter bliss! Like many I'm sure I'm now
currently going through the “oh god no” motions at the thought of
going back to work!
Not
feeling QUITE so ready to part from the festive feels just yet here's
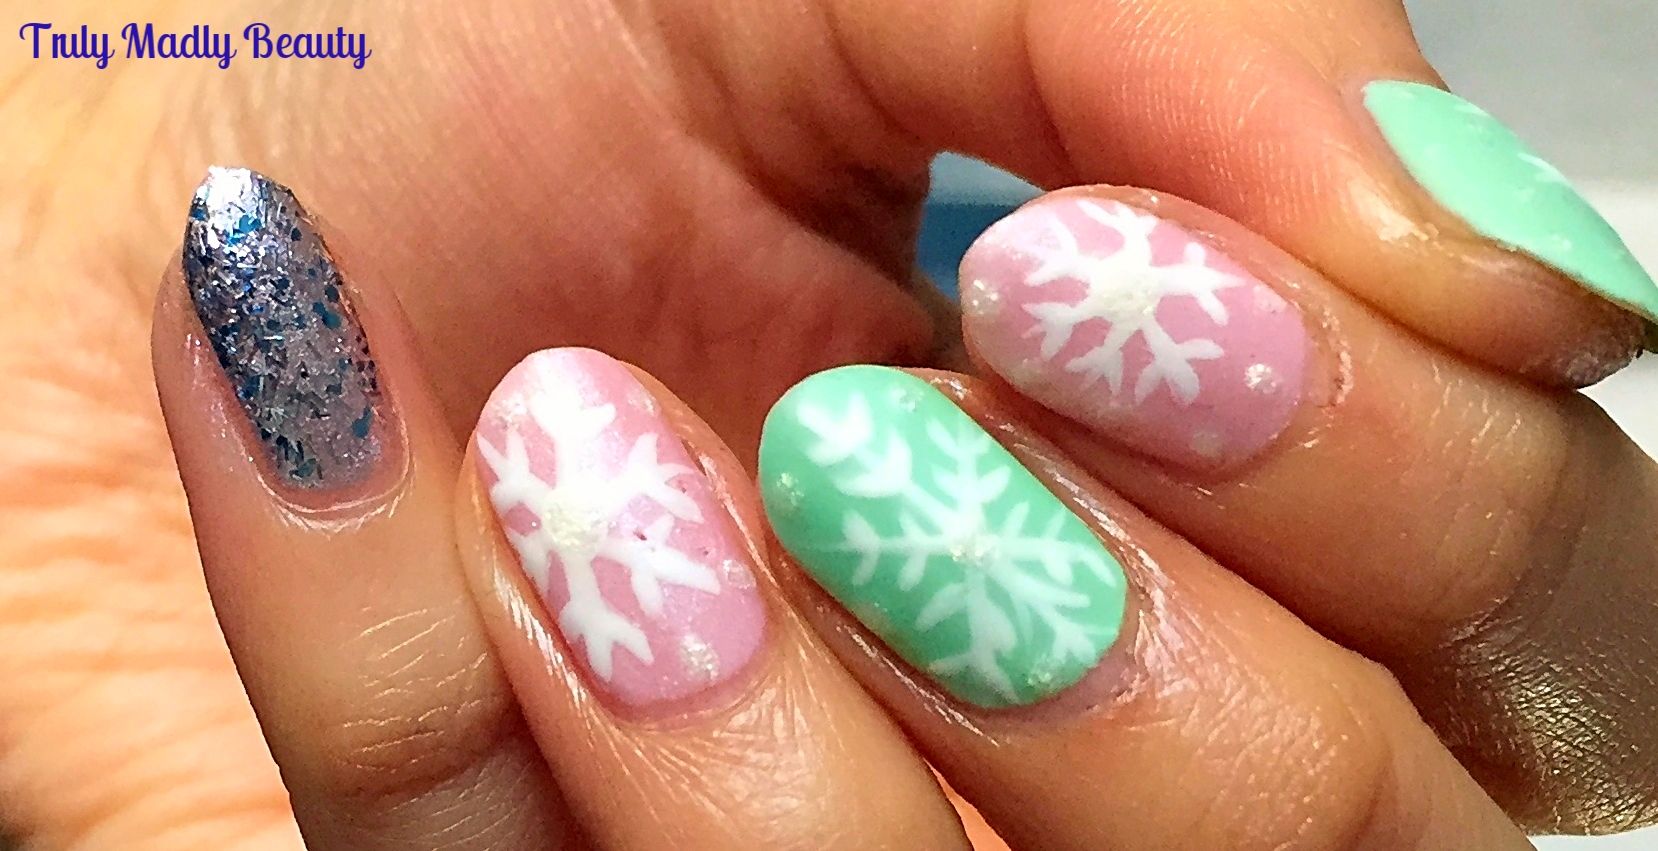
a frosty Pastel Winter Wonderland mani using sugary soft tones,
snowflakes & a bit of glitter thrown in! Normally I'm a glossy
girl all the way, however for this mani I decided to mattify the
finish & I must confess I dig it!
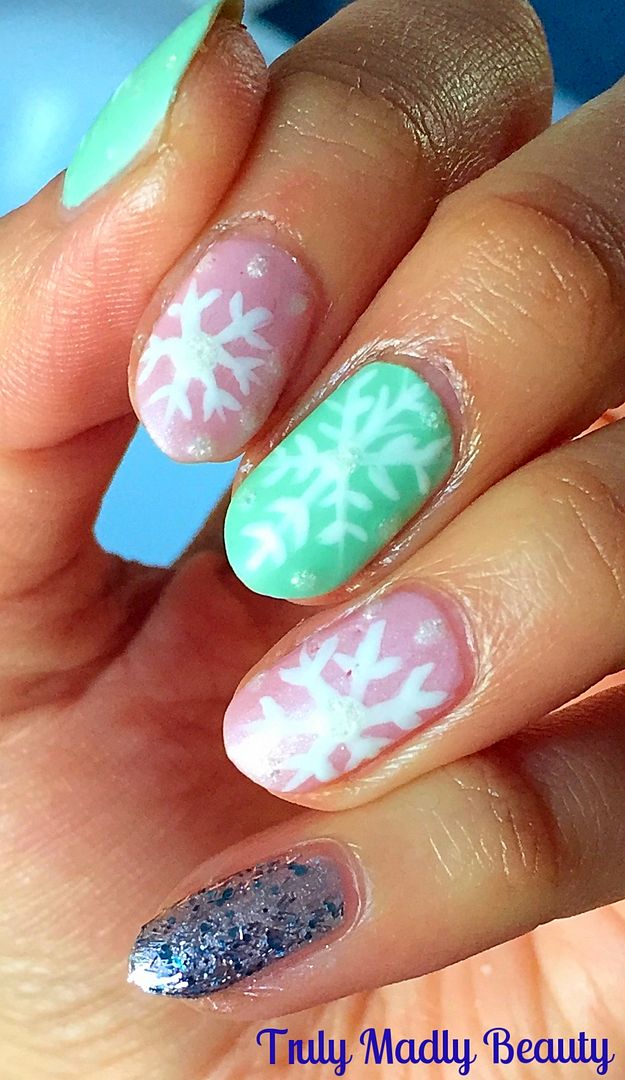
I
wanted some pretty pastels for my base, not able to decide I went for
a two tone using pale pink & mint.
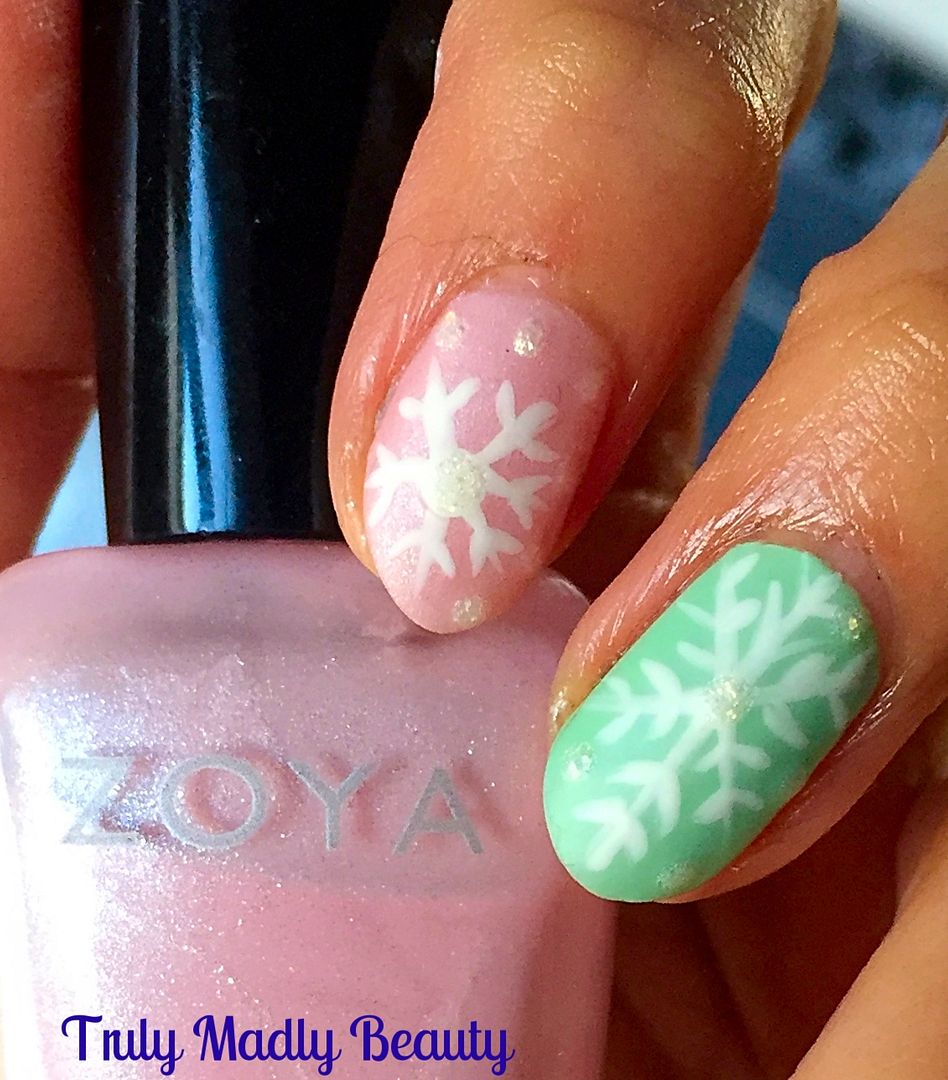
For
the pink I've used two coats of Zoya Bailey, a gorgeous soft pink
with a pretty pale silver shimmer running through it.
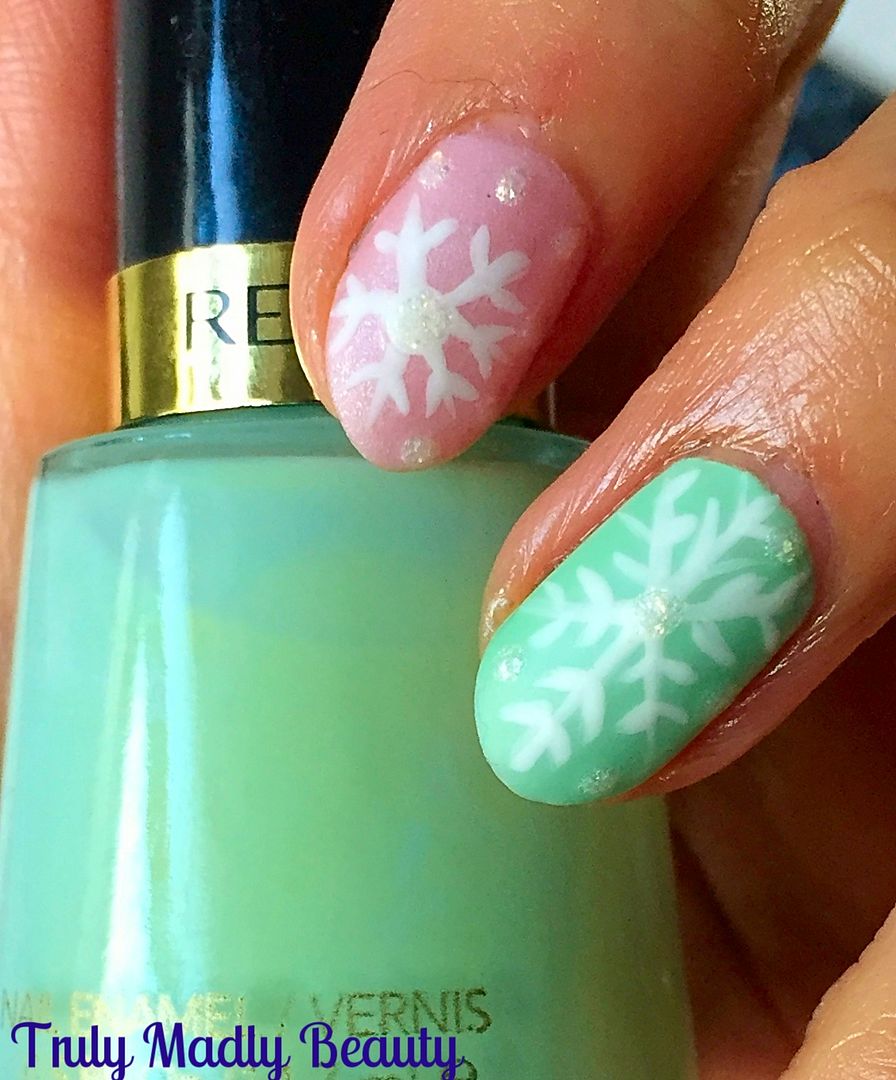
For
my mint green nails I went for one of my vintage Revlon polishes,
this is the aptly named Minted of which two coats were also applied.
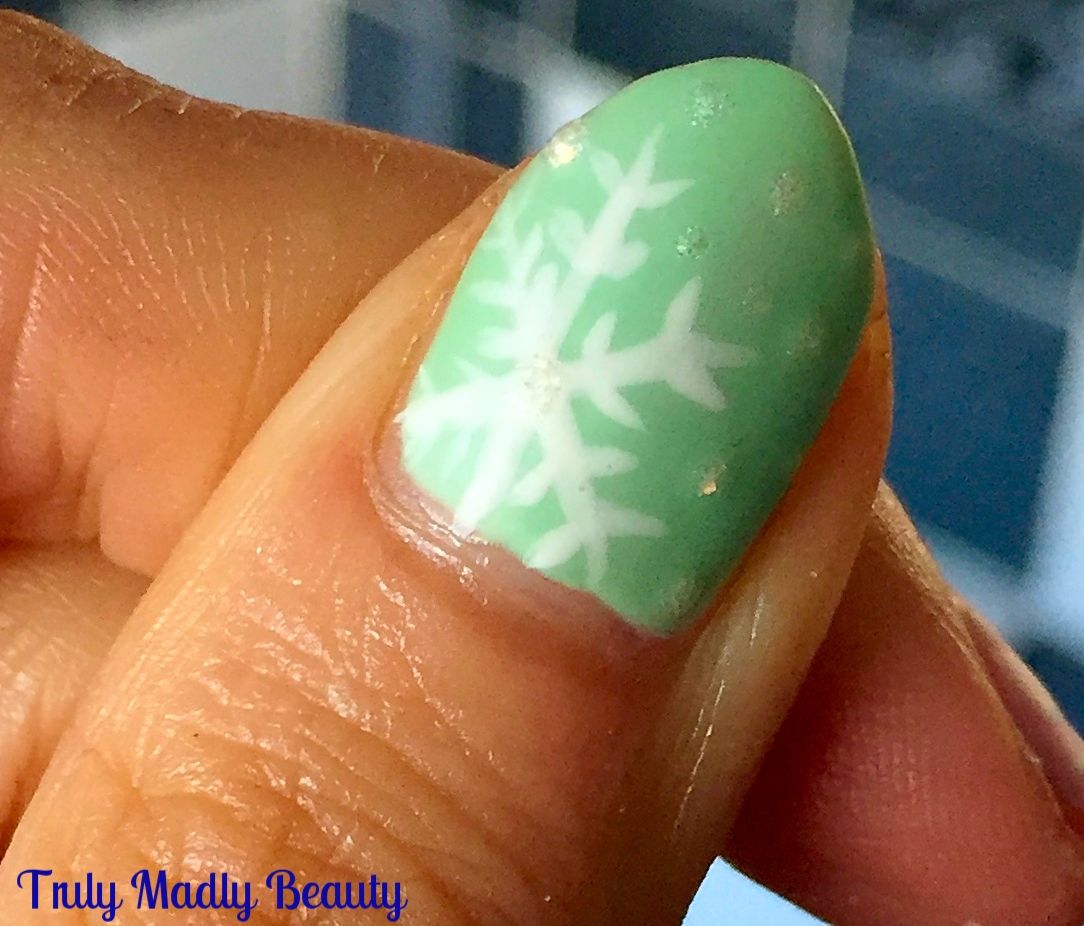
Creating
the snowflakes is easy peasy, using a fine nail art brush & some
white polish simply draw an X on to your nail wherever you'd like
your snowflakes placed, then draw a vertical or horizontal line on
top.
Now
add on your snowflake details by placing smaller angled lines along
the cross, playing around with different styles, sizes & designs!
To
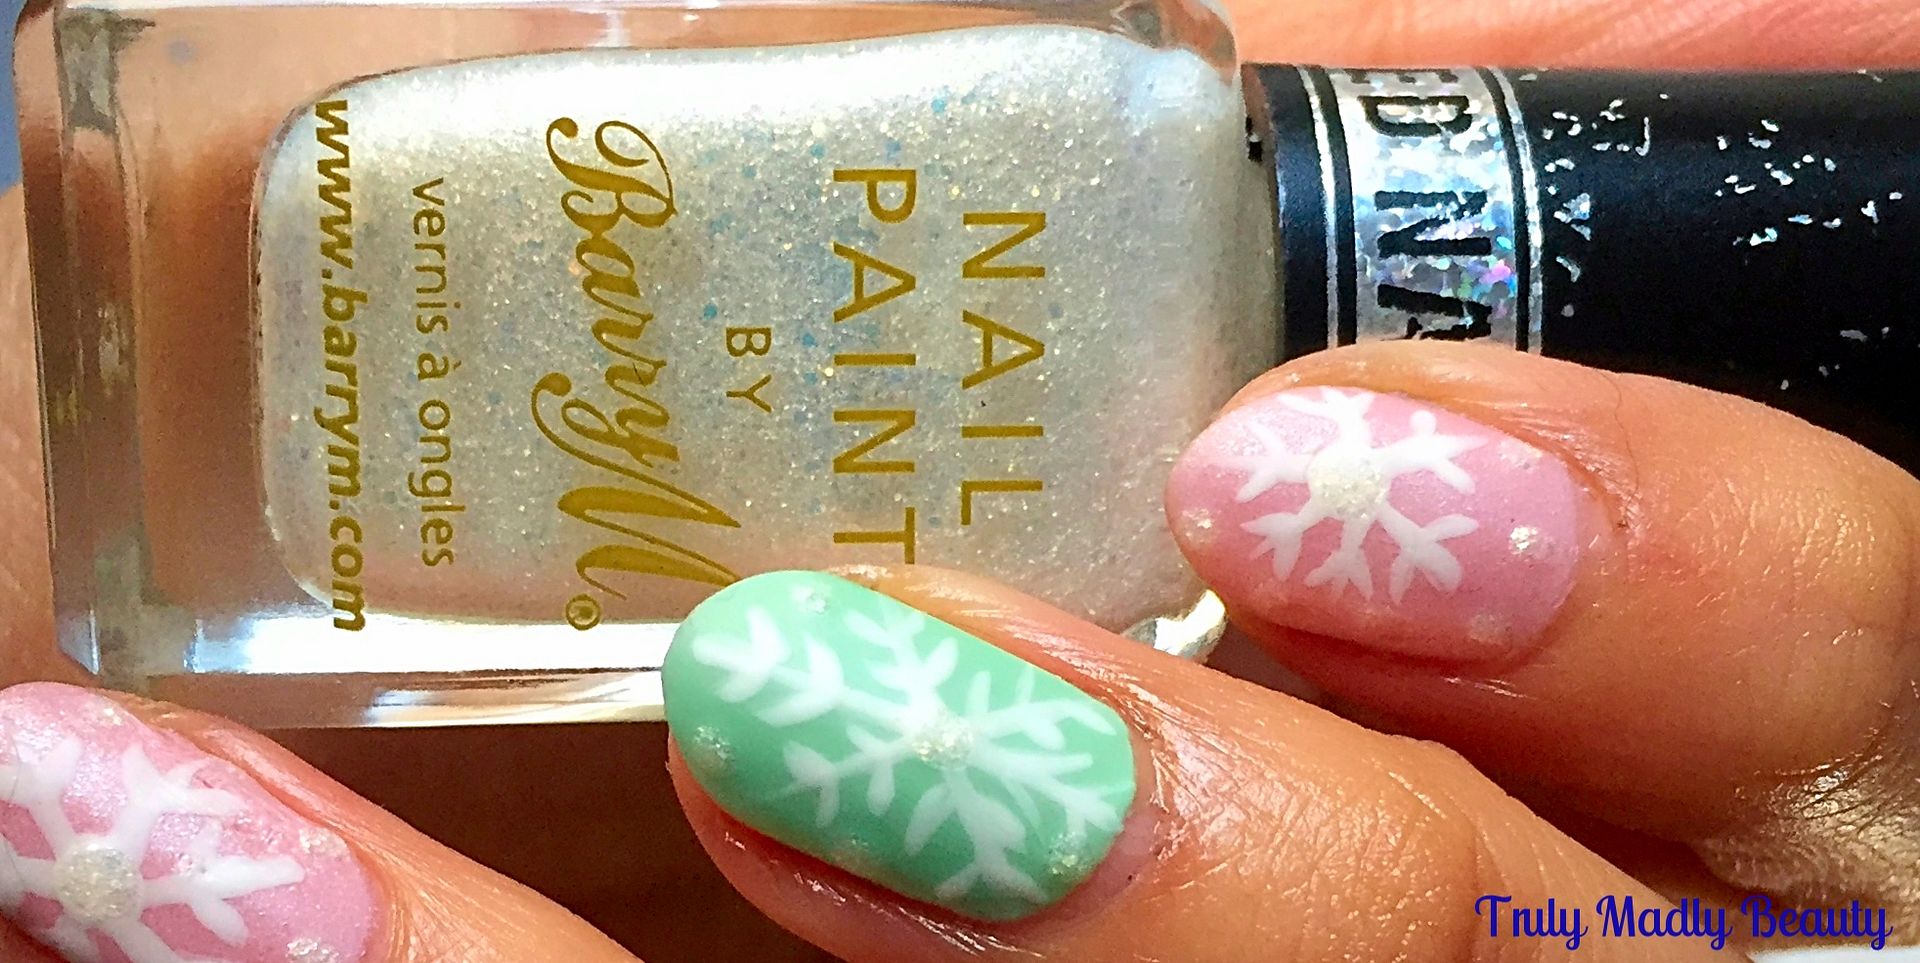
add a bit of dimension to the pastel nails I dotted on a bit of Barry
M textured polish in Lady which is a really unusual & pretty
frost white shimmer.
Then
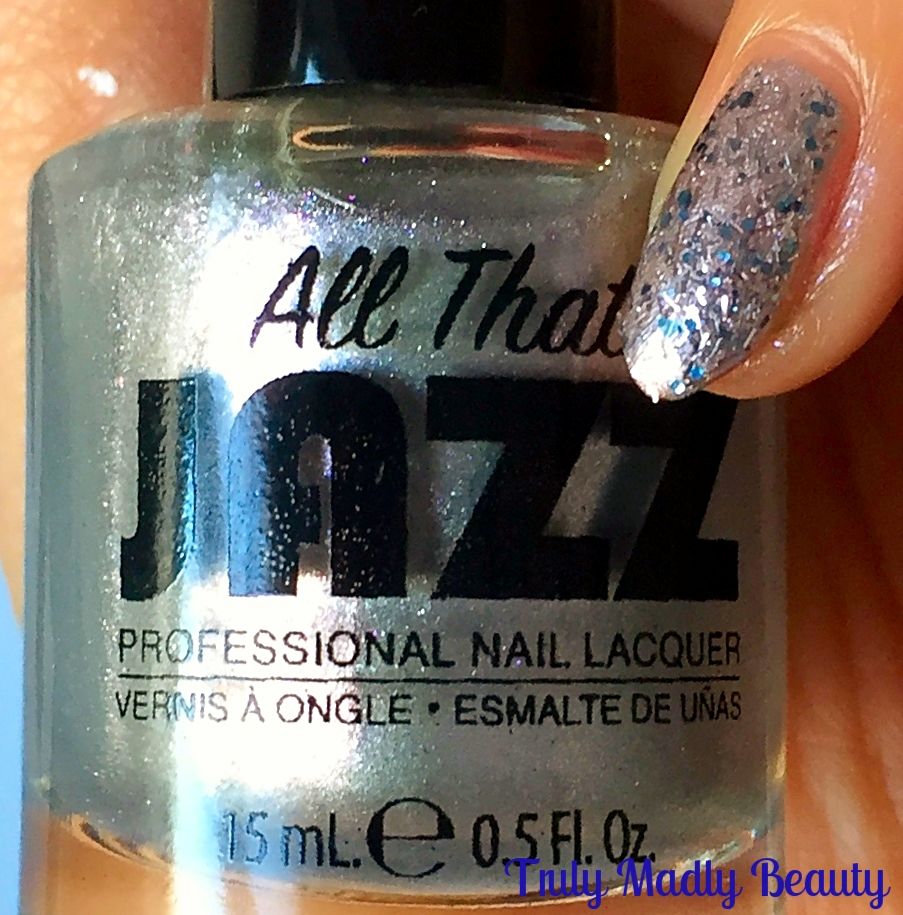
for the accent nail I applied two coats of this pretty silvery All
That Jazz polish. I couldn't for the life of me find the name of the
shade on my bottle, unless I was having a dunce moment which, lets be honest, is most likely, but it could be the shade Glam Squad
For
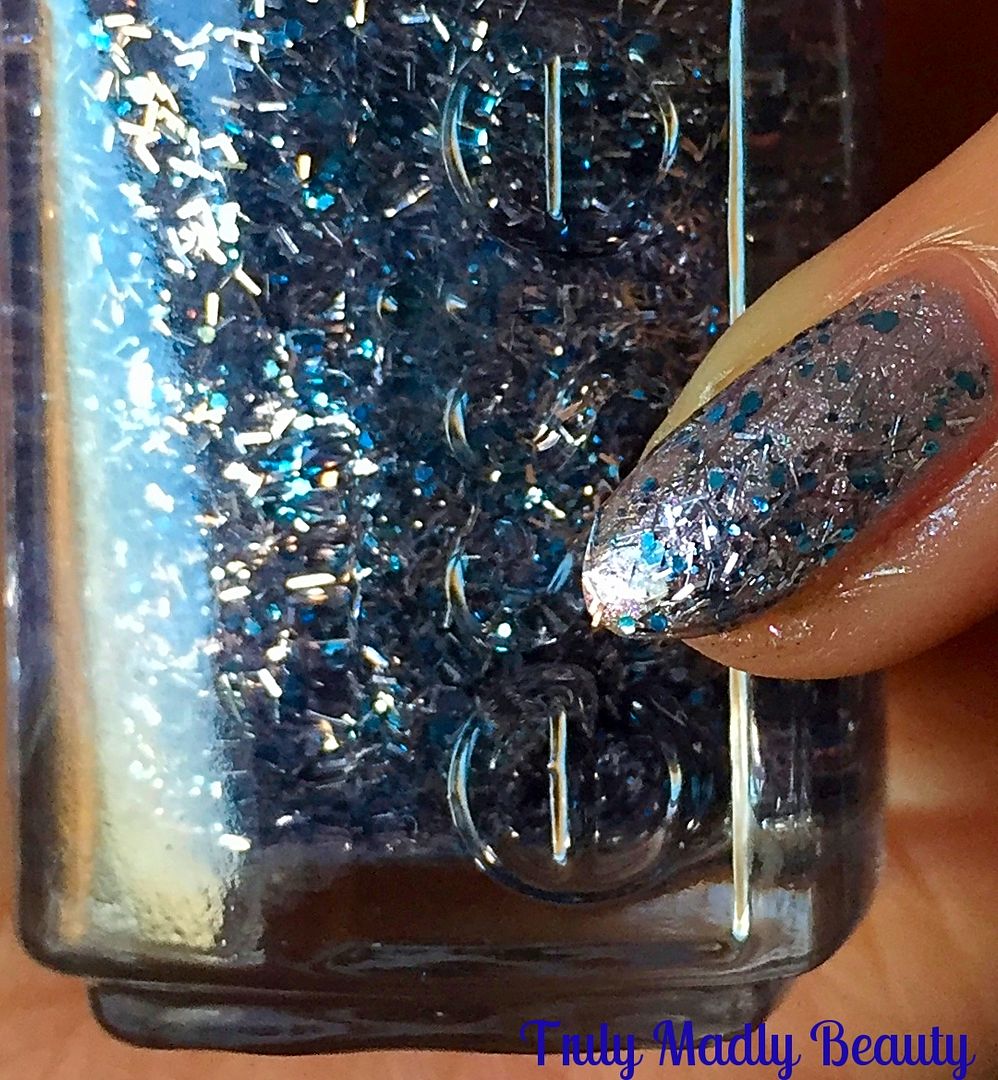
the final touch I coated the silver pinkie with this beautiful silver & frosty blue bar & hexagon glitter mix courtesy of Essie Luxe Effects in Frilling Me Softly.
As
mentioned before I decided to go for a matte look so to finish I
applied a Rimmel matte topcoat to the pastel nails. Matte pastel
manicures may just be my new favourite thing! I don't know if its the sweet tooth but this finish reminds me of cake frosting!
First
post of 2017 done! Now I'm off to hunt down that Fondant Fancy that I know is in the cupboard begging to be eaten to satisfy the sugary sweet craving this mani has enabled. Thanks as always for sticking by to read my rambles, here's to a fab year!
Lotsa
love to ya!
11.03.2016
Autumn/Fall Inspired Diva Nails & Tutorial!
Hello
there lovely readers!
Halloween
took precedence when it came to my nail art over the past few weeks
but now that has passed *sobs* I can now embrace Autumn in all its
glory with some Autumnal nails! There's still time non? Better late
than never...I'm definitely an Autumn baby & adore this time of
year with its abundance of burgundy tones, blankets, bubble baths,
burning candles...ungh I LOVE IT!
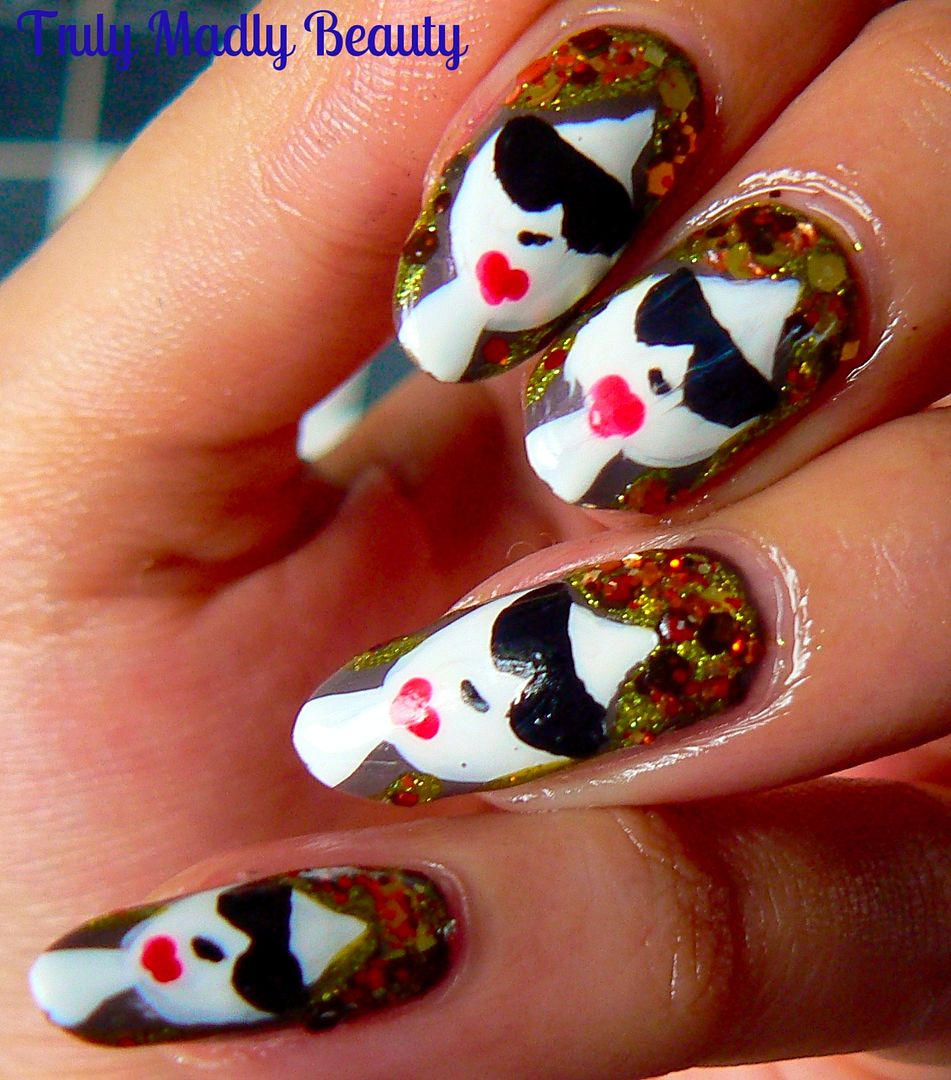
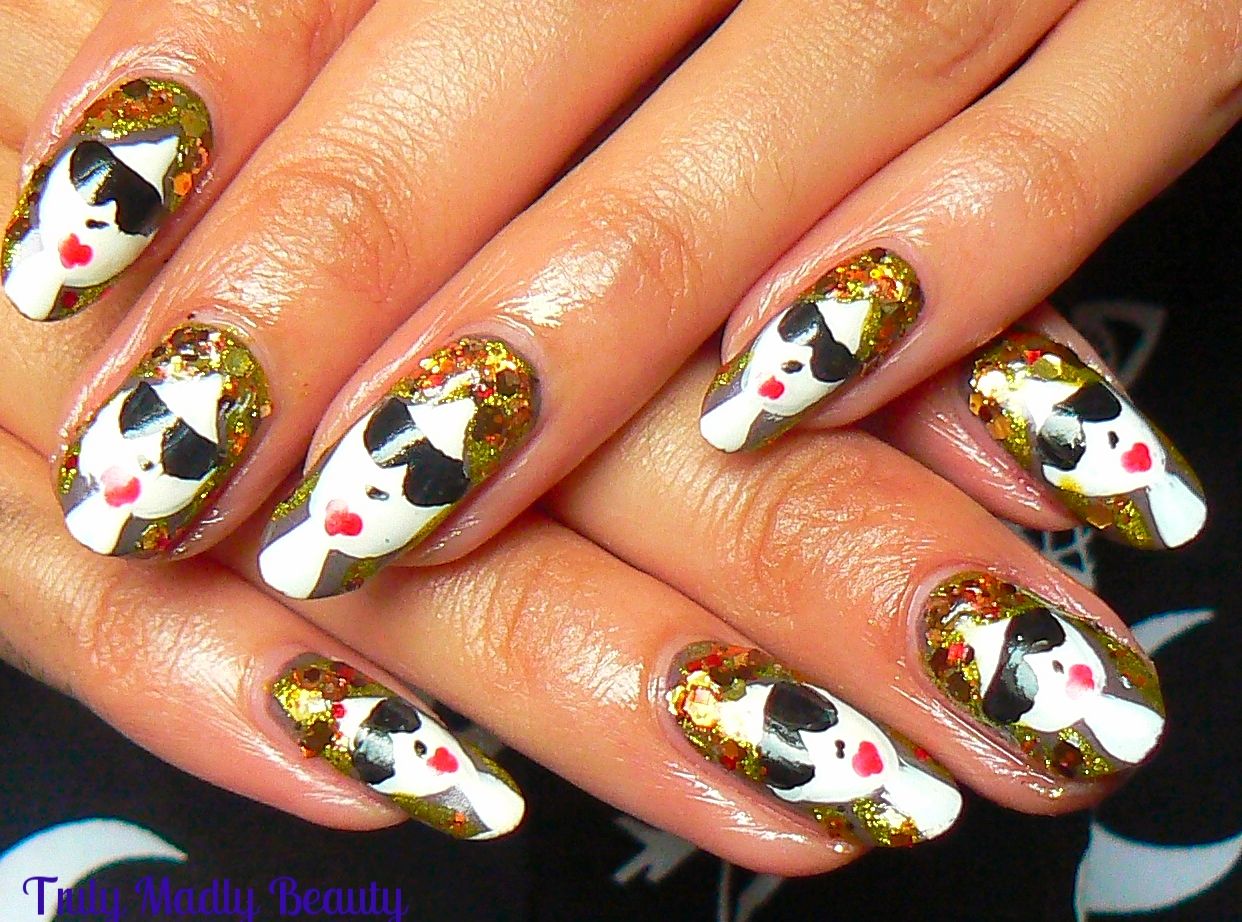
Naturally
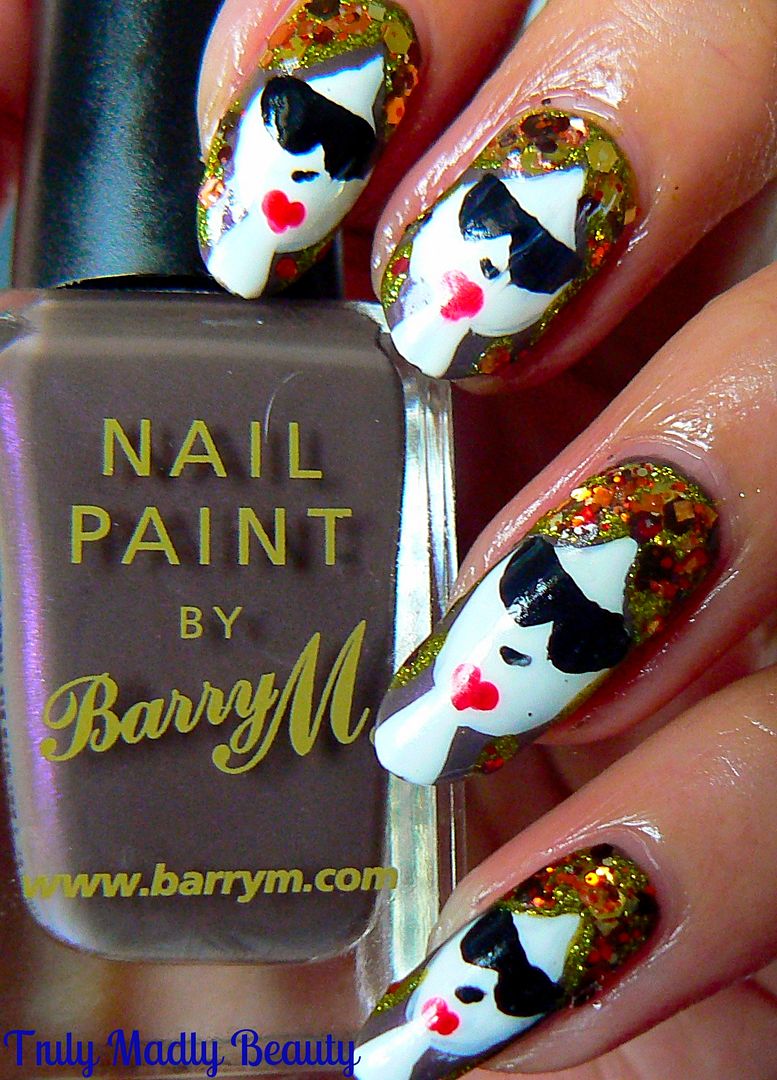
my favourite way of expressing myself is through my nails so I got to
thinking & created this Autumn vibed design featuring a pouting
painted diva with vibrant flowing hair reminiscent of burnt Autumnal
leaves!
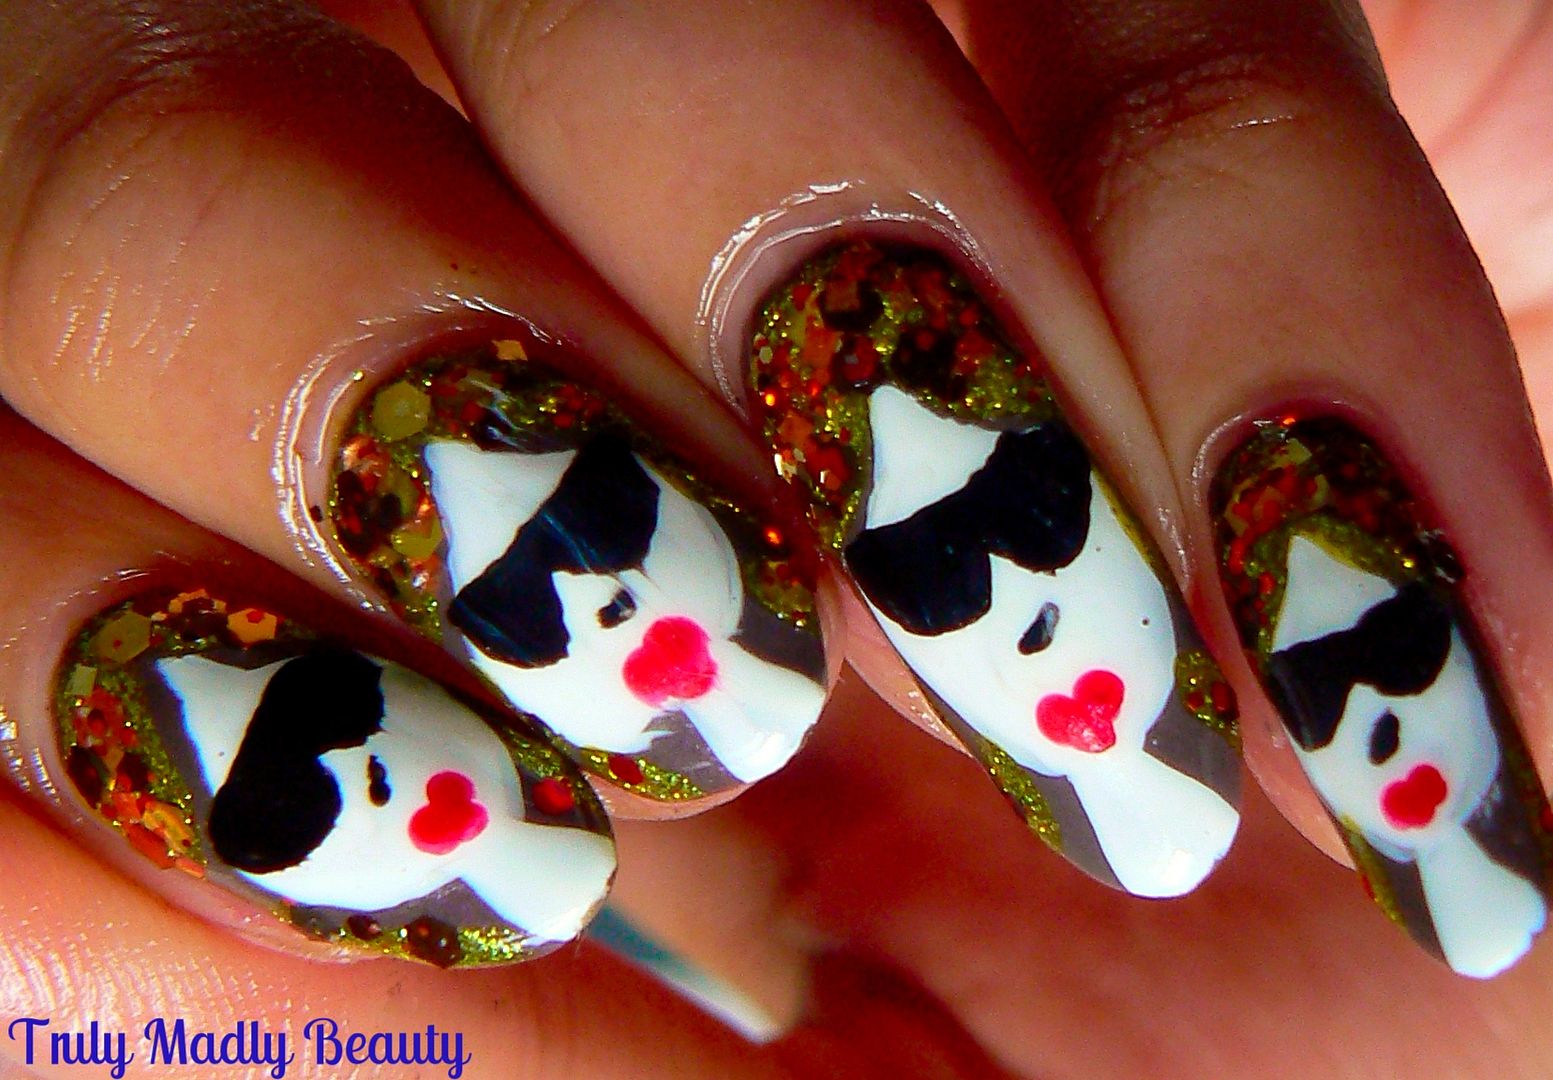
I
was inspired by a Robin Moses Tutorial on YouTube, her nail art
designs are wonderful, in her design she created the one lady accent
nail & incorporated her flowing Autumn/Fall leaved hair over the
remaining nails. I loved the look so much I decided to do an
individual painted lady on every nail!
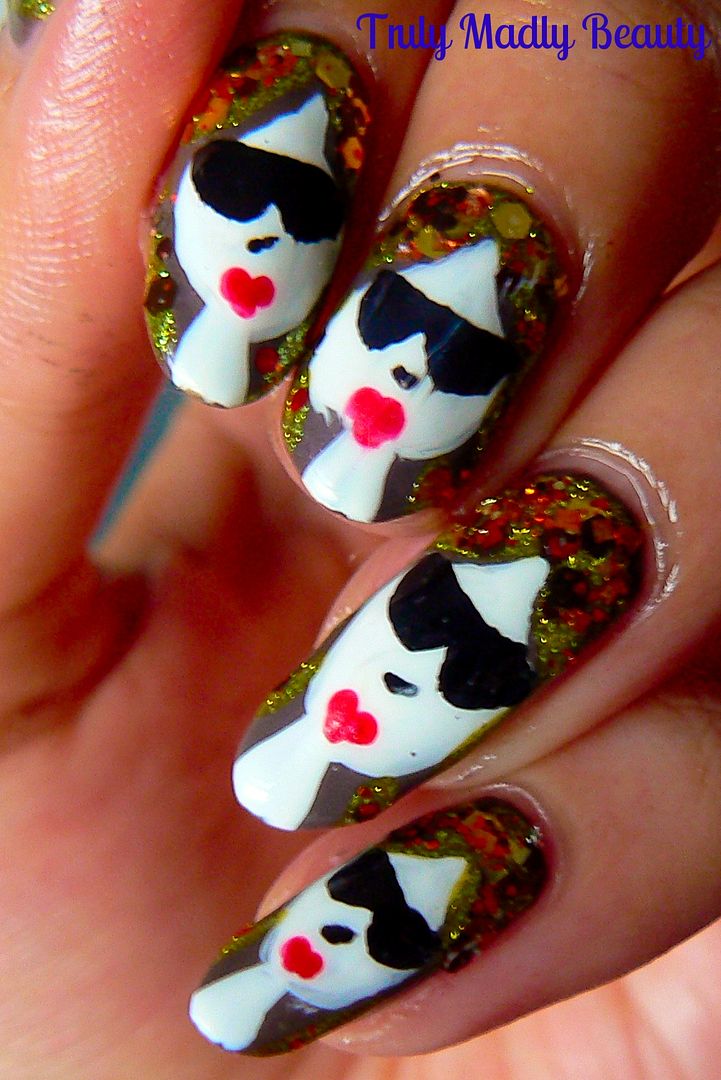
To
re-create this design is easier than it seems & I've done a step
by step pictorial for you to show how you I did mine...
Begin
with your base colour, wanting to keep with the Autumn tones I
reached for Barry M Dusky Mauve. Remember when everyone went doolally
over this shade due to its high dupe level of Chanel's Paradoxal?
Here I've applied 2 coats of this lovely purple griege shade.
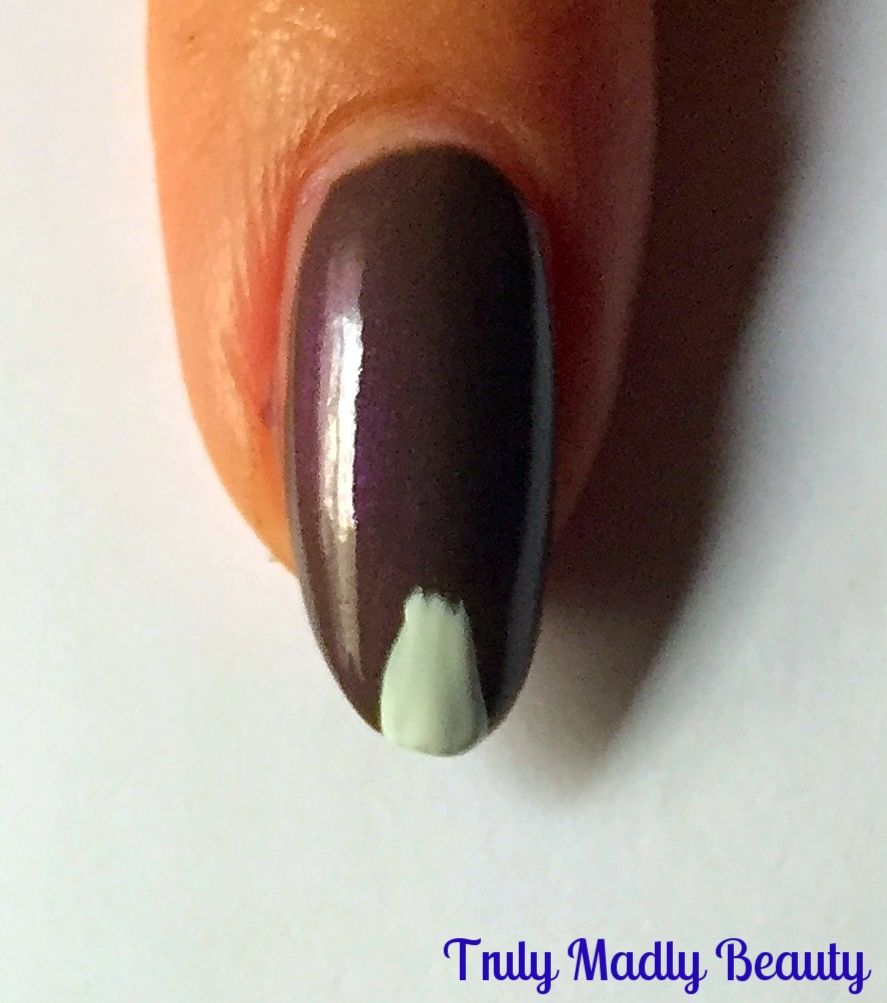
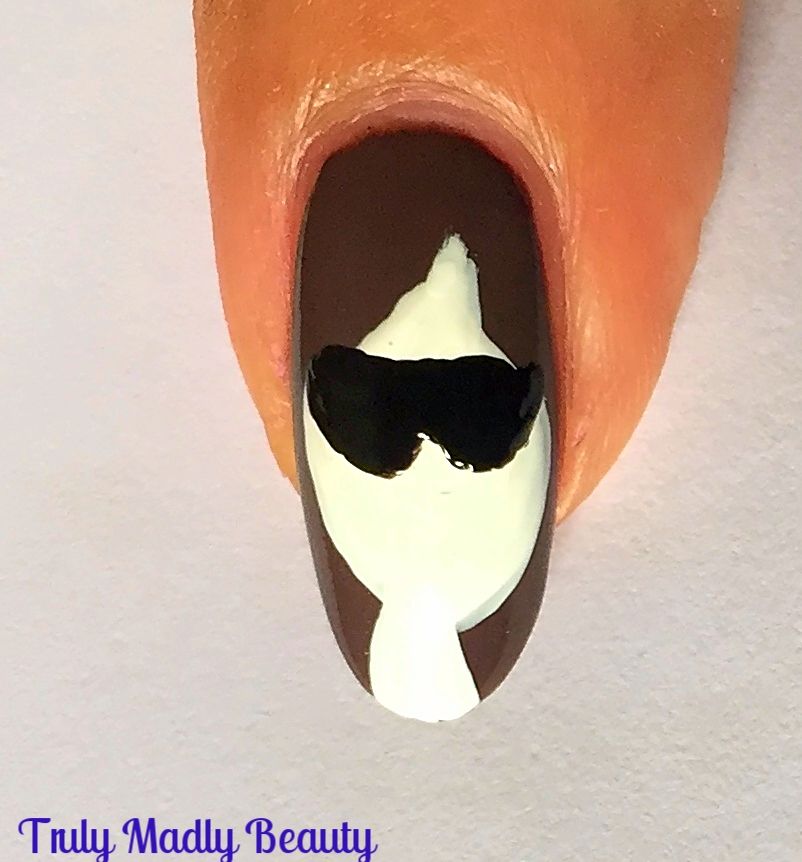
Now
to begin creating our shaded divas, start with applying her slender
neck starting at the tip of the nail, using white polish & a nail
art brush.
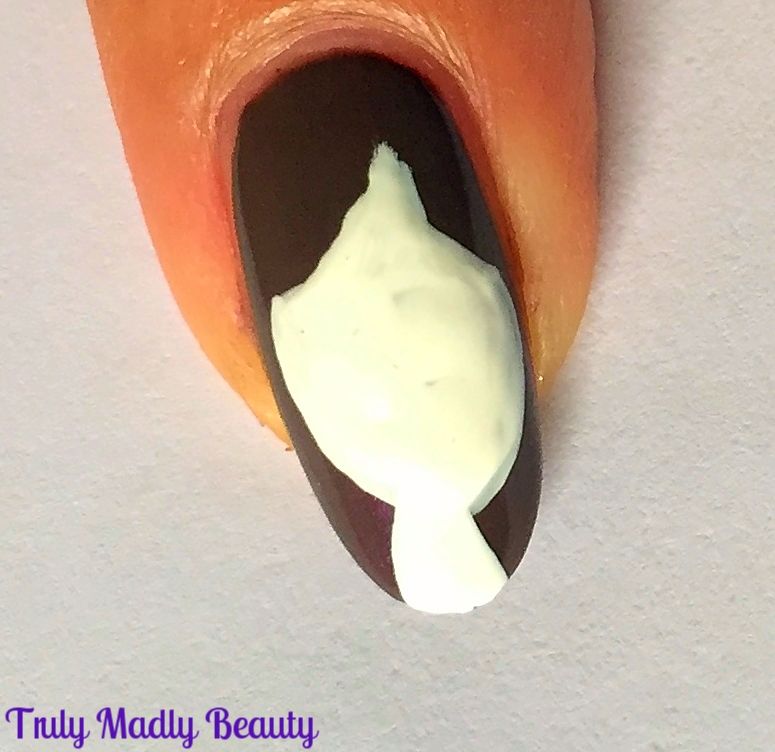
Now
to create the face, using your thin nail art brush & white
polish, start about 3/4 of the way up your nail where you want the
forehead to be & draw a curved triangle with the top point angled
slightly to the right, to give the appearance of bangs/fringe, then
continuing on from the two bottom points of your triangle,curve a
round oval like shape down to the neck before filling in.
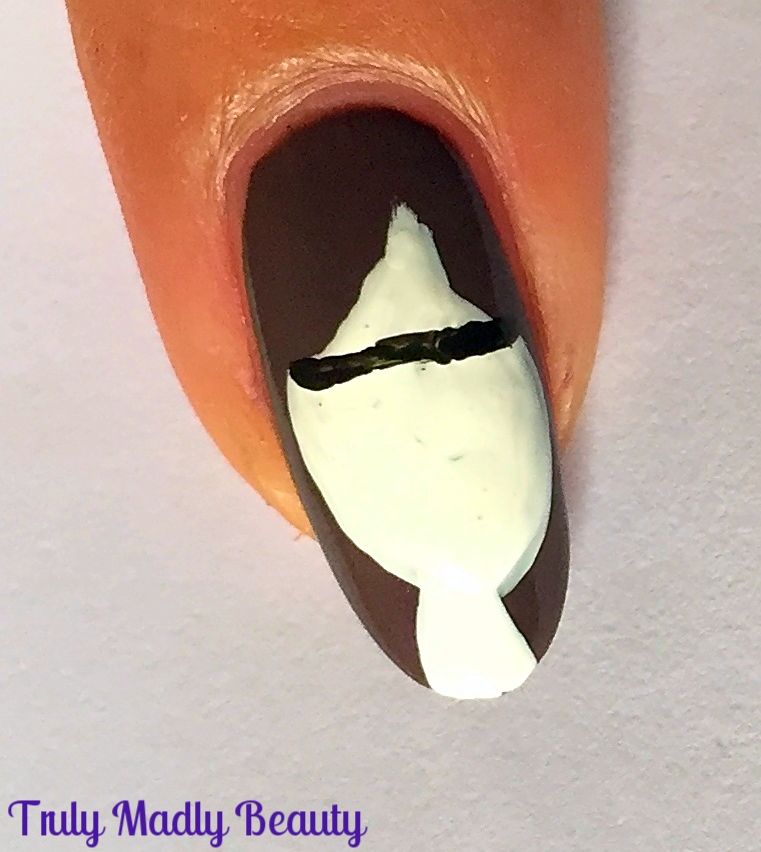
Next
step is to add on our ladies sophisticated sunnies! Because even
though its Autumn, shades can be rocked ALL YEAR ROUND. To do these
simply start by adding a thin horizontal black line just underneath
the fringe/bangs.
Then
with the same black, underneath your line add two semi circle-esque
shapes to create lenses.
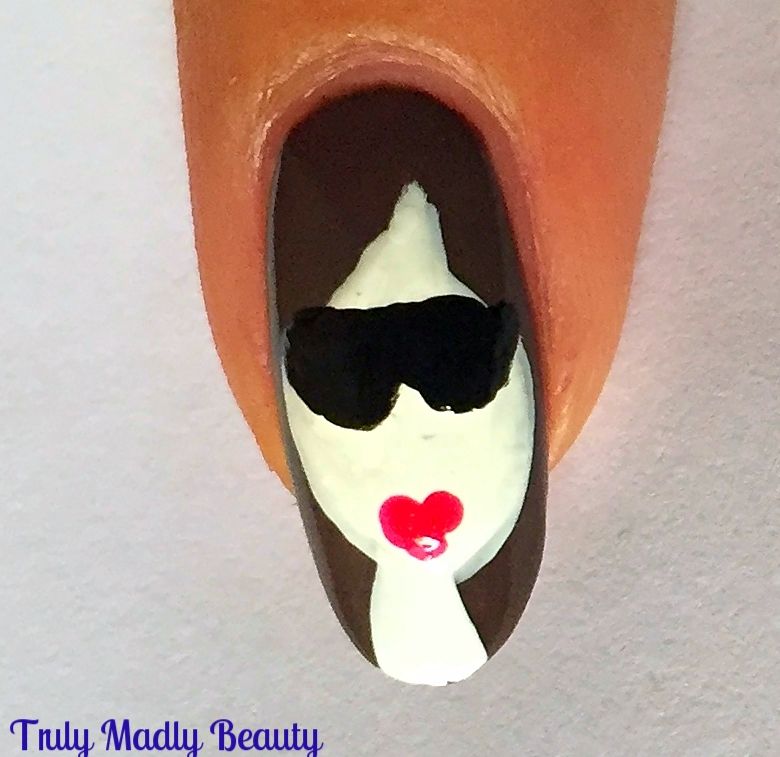
Now
for our diva's pout, grab a pink or red polish & a dotting tool
or a bobby pin & place two dots of red with one dot underneath,
almost creating a heart like shape for the lips.
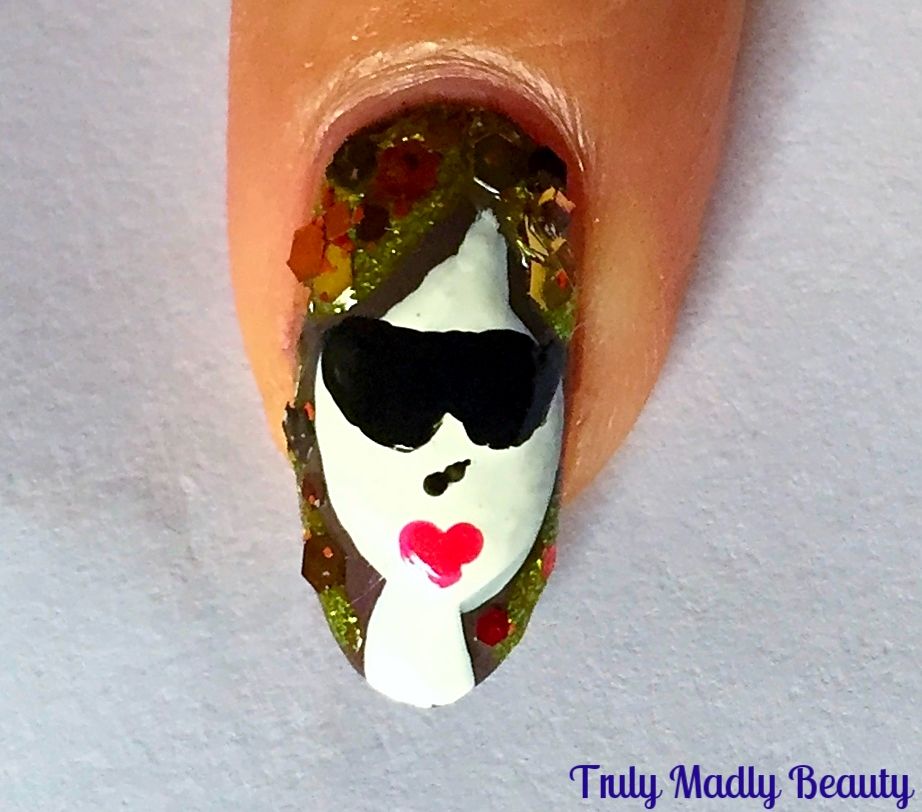
Final
detail to the face is a tiny angled line for the nose before you can
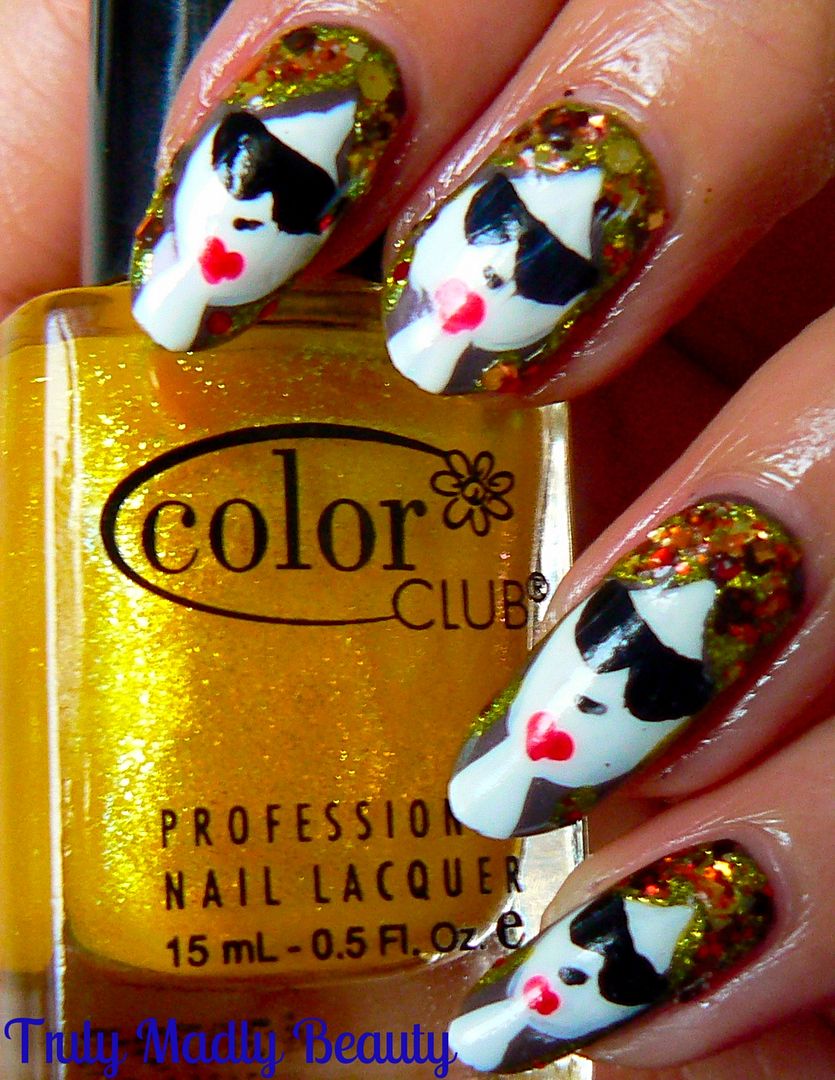
go to town with all the Autumn colours for her hair! I decided to use
a shimmer yellow polish by Color Club to add on some strands in the
brown, because its ALL about the balayage babes, before using the
aptly named Autumn Leaves glitter polish by indie brand Coco Allure
which I picked up from Etsy donkeys ago!
As
the glitter in this polish is quite large I poured out a bit of the
polish on to a piece of paper first & then used a toothpick to
pick up the pieces of glitter which come in shades of burnt orange,
reds, coppers & gold & just placed on to the hair.
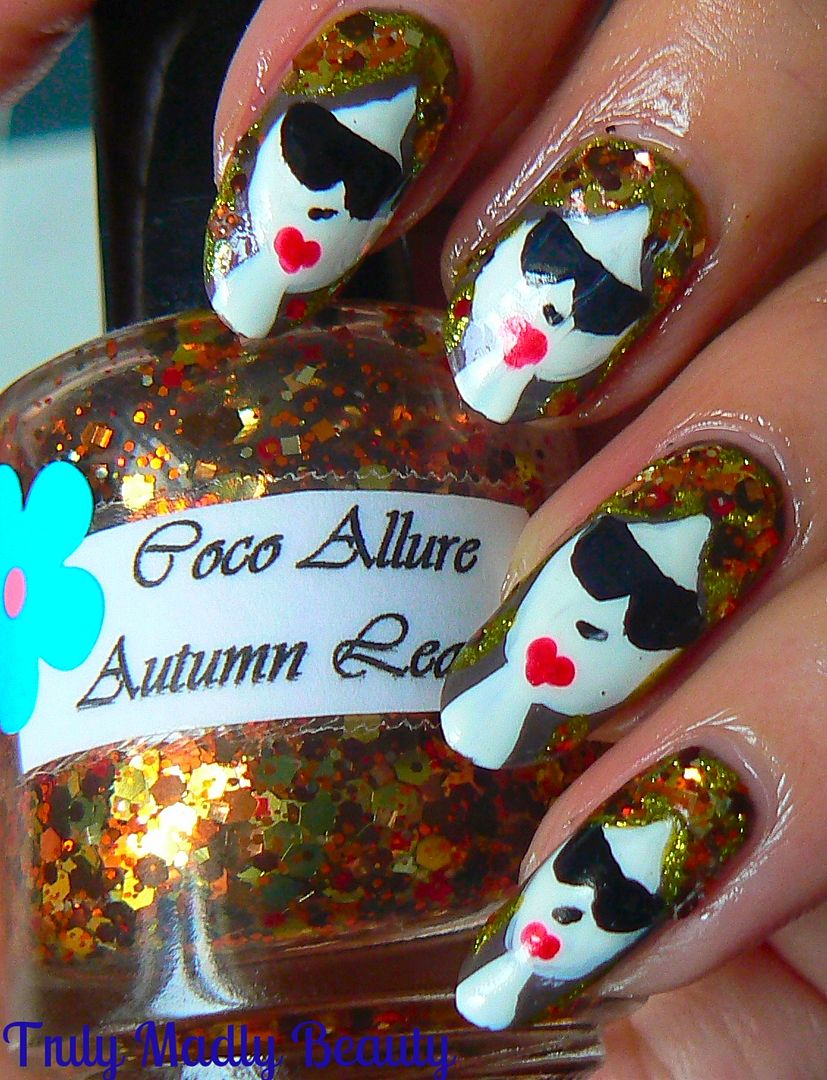
Finish
it all with a nice thick coat of topcoat & your done! Thank you
Robin Moses as always for the inspo, a really fun & interesting
way to wear Autumn/Fall nails! Hope you like them too!
Thanks
as always for reading!
Lotsa love to ya!
7.17.2016
NOTD - Game of Thrones Fire & Blood Inspired Nails...
Hello
there lovely readers!
Ooooh
its been a while since I've used a good flakie polish! Well I thought
it was high time I rectified that situation ASAP today...
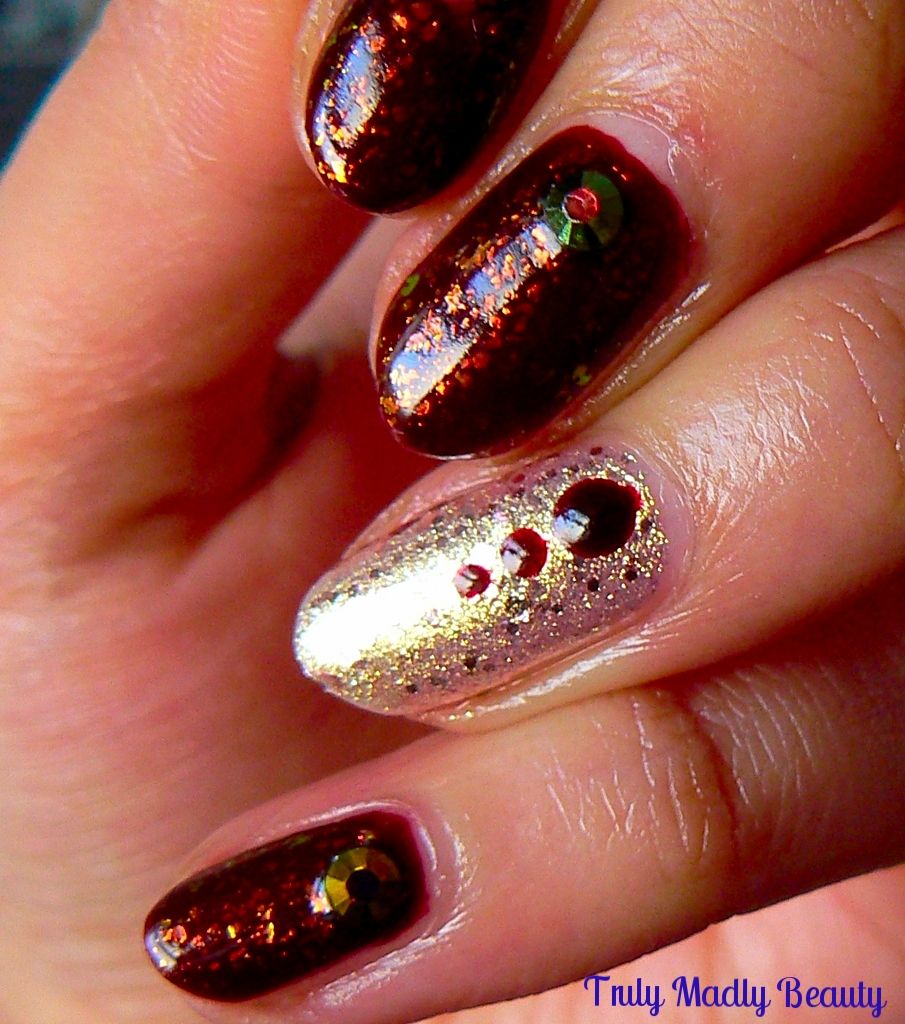
Flakie
polishes are a fab way to jazz up an otherwise ordinary shade if you
are after a little something different but don't want to go down the
whole glitter route. Flakies are basically fine shards/flecks of
holographic glitter, usually suspended in clear polish however you
can find some serious rainbow POW WOW flakies these days...*looks at ILNP*...prepare your eyes for some serious sparkle! Note to self: BUY
ALL THE ILNP FLAKIES.
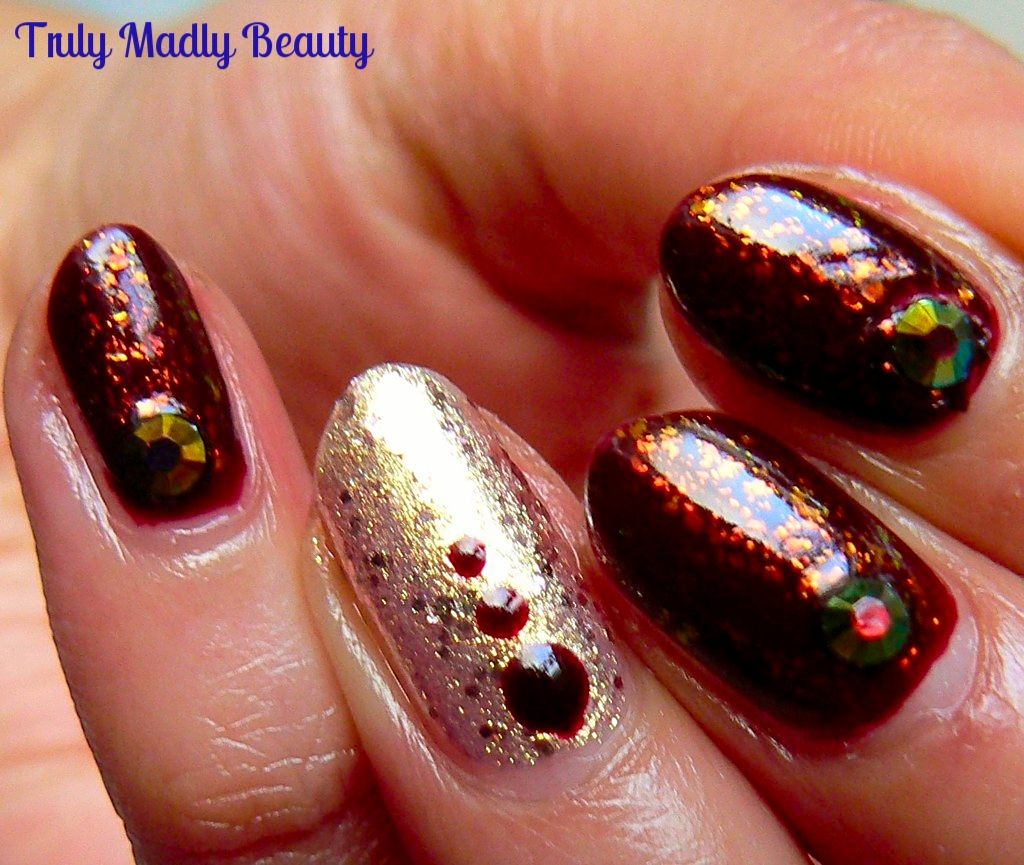
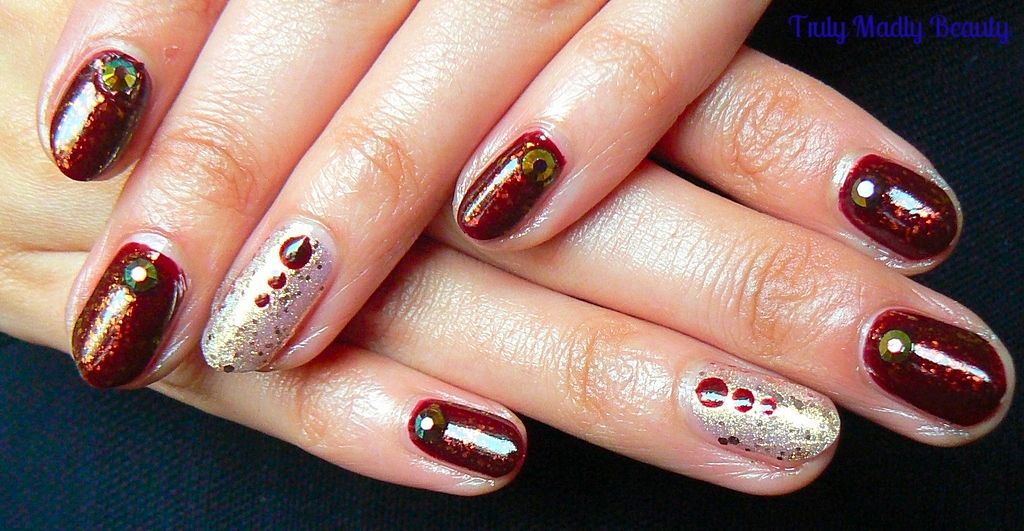
I
was having a brain-fart moment & couldn't decide what to do,
finding myself engrossed in reading my current Game of Thrones books
plus having (finally!) started watching the TV series, I used this as
inspo & combined a mixture of my favourite things, glossy
burgundy, antique gold, pretty stones & of course a bit o' flakie
to create a vampy medieval Fire & Blood Game of Thrones vibe
mani!
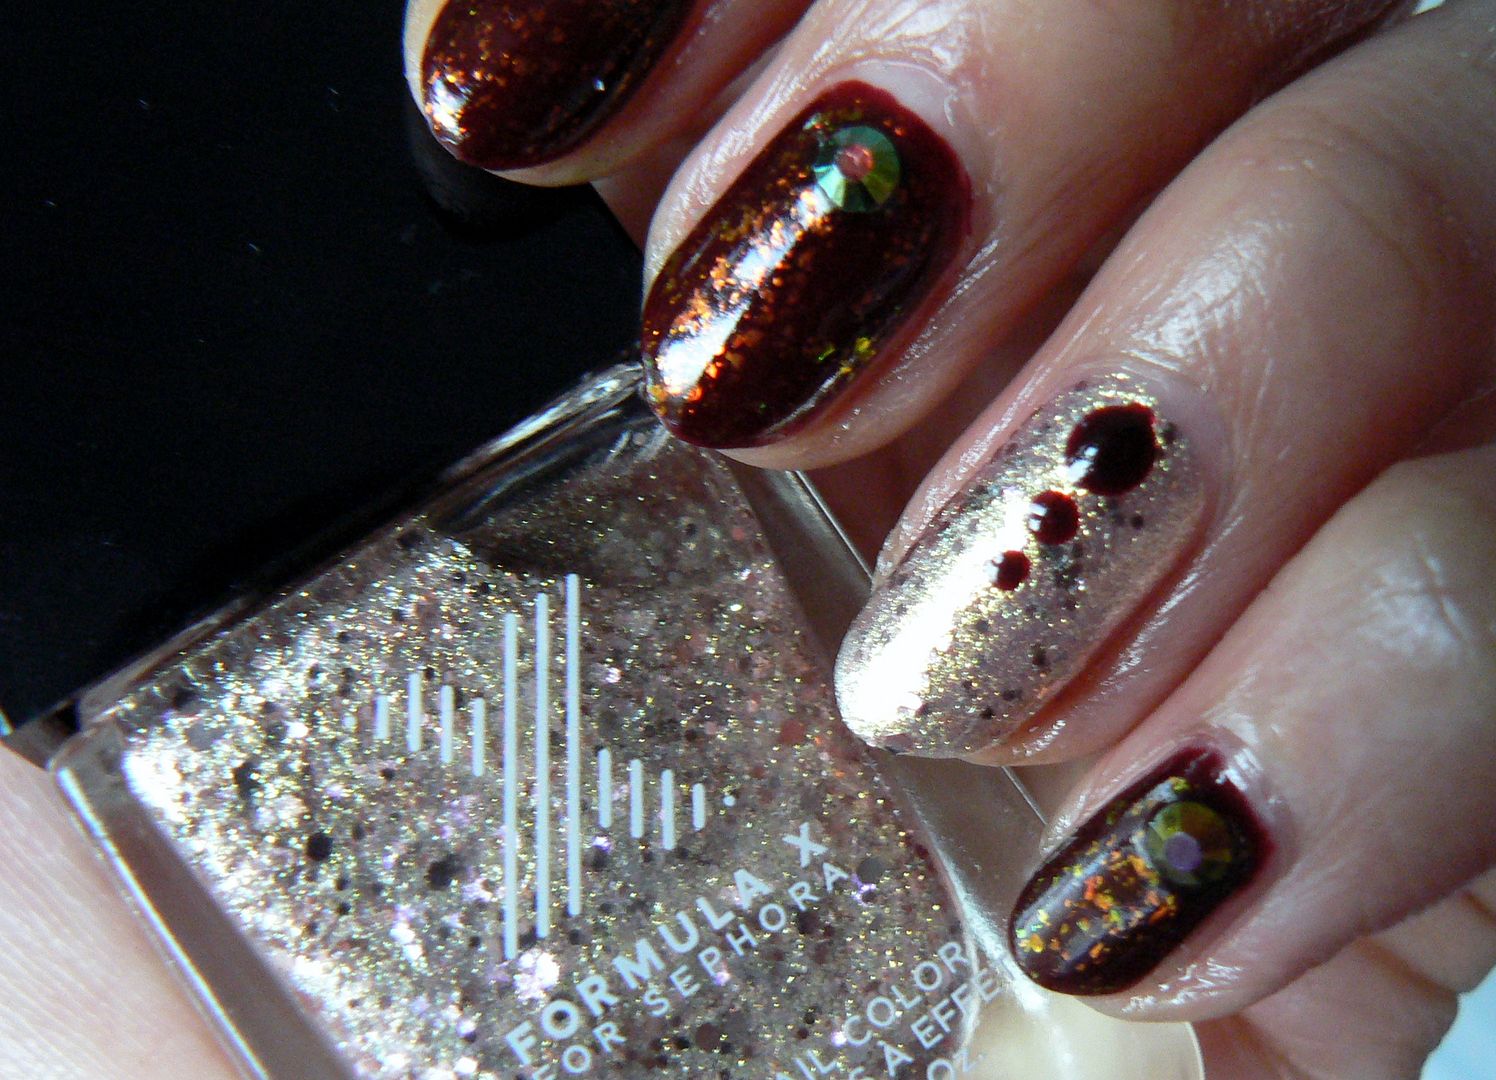
For
my gold fix I used two coats of Formula X Love Chemistry on my
pointer finger which I picked up in Sephora during my NYC trip last
year. I must be the only blogger to visit Sephora & come away
with nothing but polishes haha! But then I guess that shouldn't
really surprise. Love Chemistry is a swoon worthy pale gold foil with
pink hexagonal glitters, so pretty!
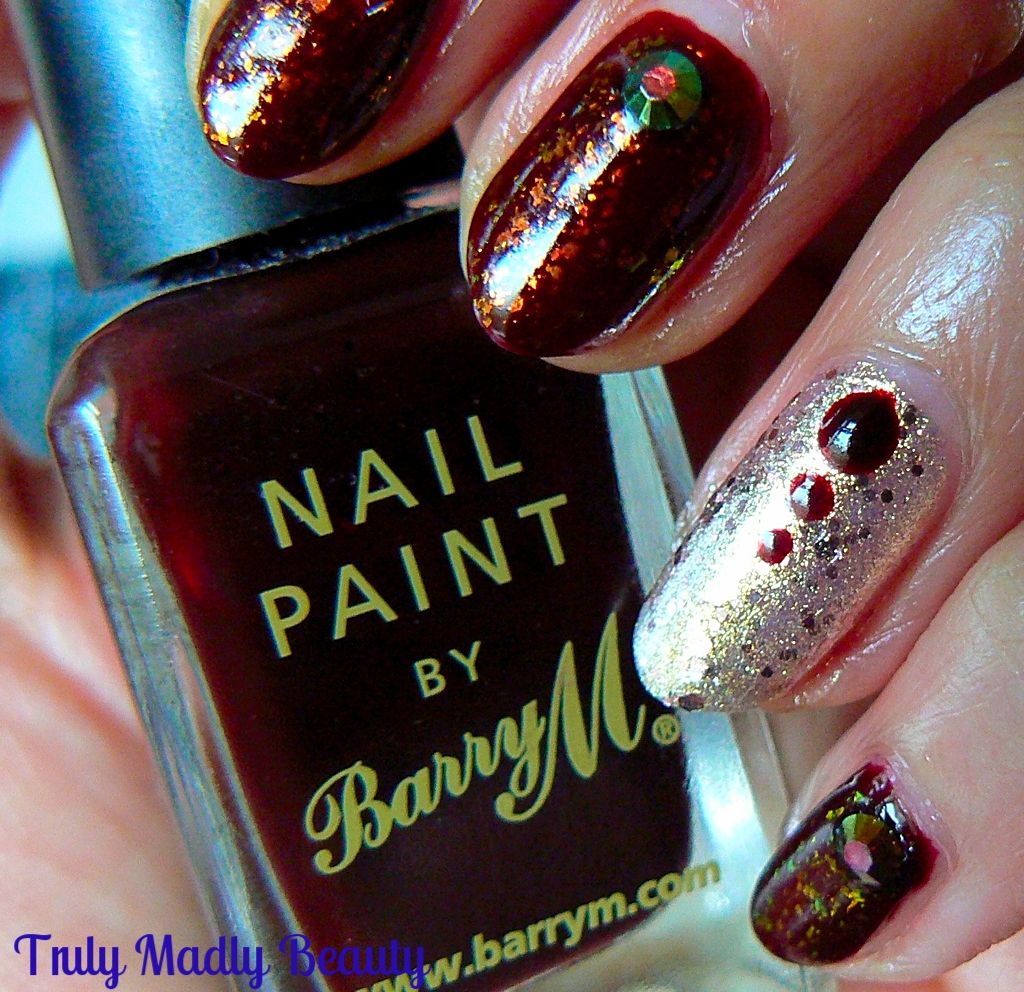
Then
for the gothic blood touch, of which there is no shortage of in GofT
I'm sure you'll agree, I reached for a golden oldie, one that
has actually been repurchased I love it THAT much, good old reliable
Barry M Red Black. Two coats leaves a lovely glossy finish.
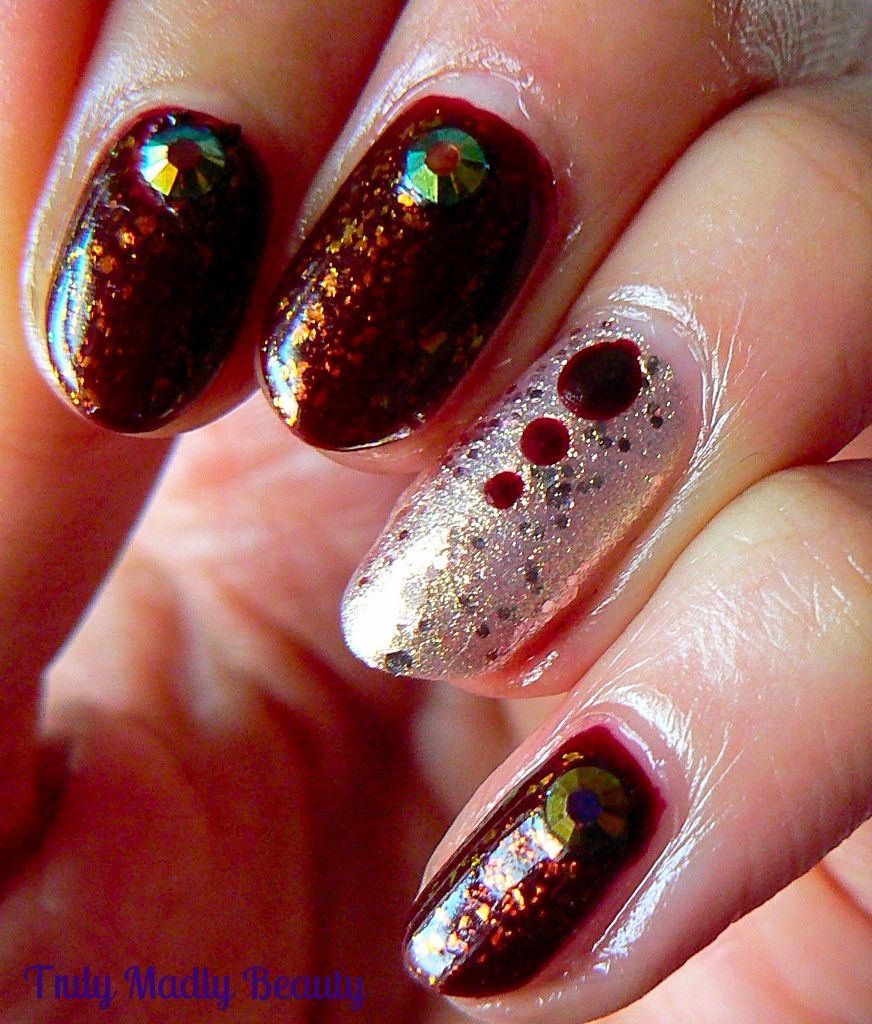
Using
the same shade I added on a trio of dots in descending size on top of
the gold nails using my double ended dotting tool which has a
different sized dotter on each side...doesn't it look just like drops of blood? I luuuuuurve it! Yes I know...I'm weird.
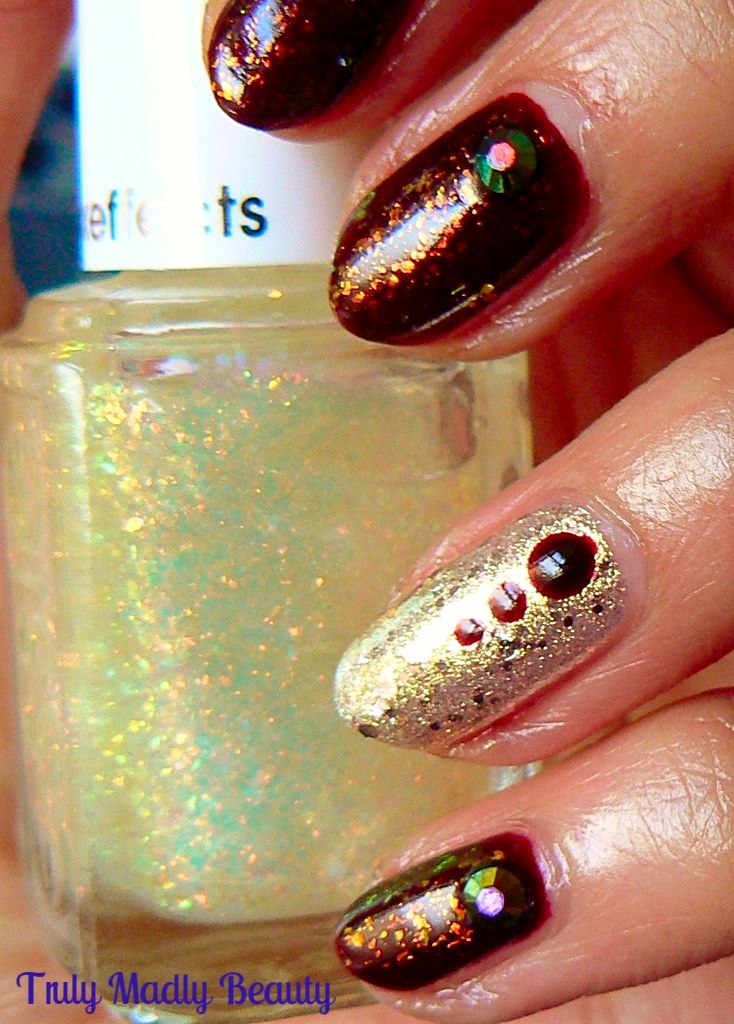
Next
for the flakie action! Here I've used Essie LUXE Effects in Shine of
the Times & oh how puuuurdy it is. Apply one coat on top the
Black Red & simply sit back & enjoy that dazzle. Depending on
which angle & light you look at it from you can detect colour
shifts of fiery orange to shimmery green.
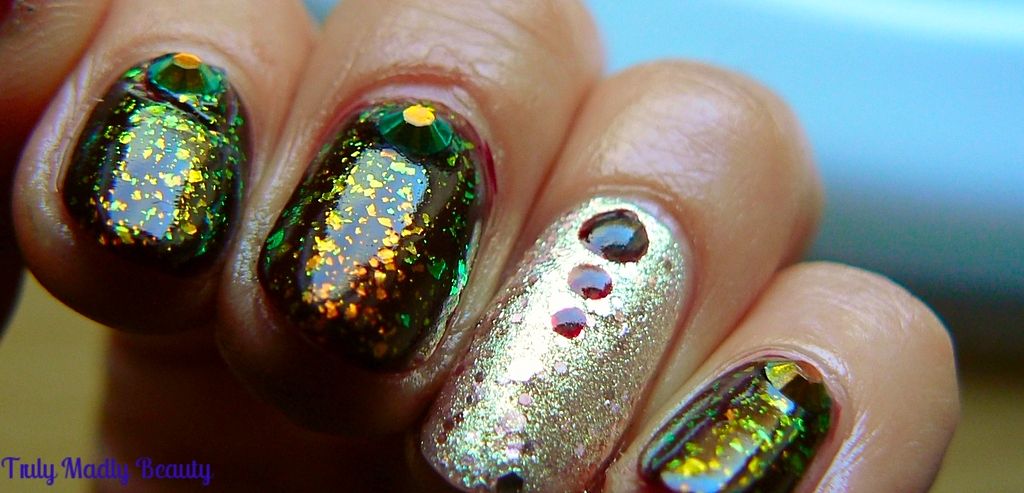
For
a final touch (because you know I'm ALL for the subtle look) I
finished the mani with a pretty turquoise tinted black rhinestone on
each nail which I picked up from Born Pretty Store, before adding
some topcoat to seal. Use my code TRUW10 for 10% off.
And
thats it! Hope you liked my darlings, any other Game of Thrones fans
out there? Thanks for reading!
Lotsa
love to ya!
Subscribe to:
Posts (Atom)