
A while back I started a Semi Precious Stones nail art series as not only am I obsessed with pretty gemstones but I also found they make for fab nail art! So far I've done some Jade Stone inspired nails as well as giving Geode Rock and Rose Quartz a go.

Today I wanted to have another attempt at your traditional natural Marble Stone. I first did some back in 2016 with a tutorial as well HERE but wanted to revamp it if you like using a different technique by one of my favourite nail artists Follow That Way. If you're familiar with Annabel then you'll know she is the QUEEN of florals! One day I WILL attempt one of her beautiful floral looks but today I've given her marble design a go!

What do you think? Do excuse my extremely odd pink toned hands there, I did this nail art after a particularly disastrous DIY home hair dye experience involving some torn gloves... O_o Ahem! Anyway, rather than using acetone to fade the lines for that marble effect as I've done in my previous recent two looks, this design is all about layering & blurring lines together using your combination of white, grey & black polishes! So all you need are these three shades as well as your fine nail art brush of course.

Starting with the base, here I've used two coats of Sally Hansen Creme de La Creme, which is an off white as I didn't want a super bright white base for my marble stone. Or it could just have been a case of me not finding my white polish so this was the next best thing...*cough* O_o However to give it a bit of extra OOMPH I applied one coat of ULTA3 Crystallina, a beautiful ethereal topcoat that give a gorgeous opalescent like finish, perfect for a semi precious stone look!

Now to slowly create your marble pattern, first go in with the grey polish & place out your first veins/lines roughly. The grey polish I've used here is Primarks Insta Glam from their Insta Girl collection a while back.

Then on top of the grey, go in with some white polish to fade it out a little into the base.
Next using your black polish, add some thin black lines on your vein edges using a light hand so your lines are nice & fine, to add definition.

You can now keep going in a with both grey & white polishes to continue blurring the veins a tad so that they end up blending together nicely into the base until you are happy!
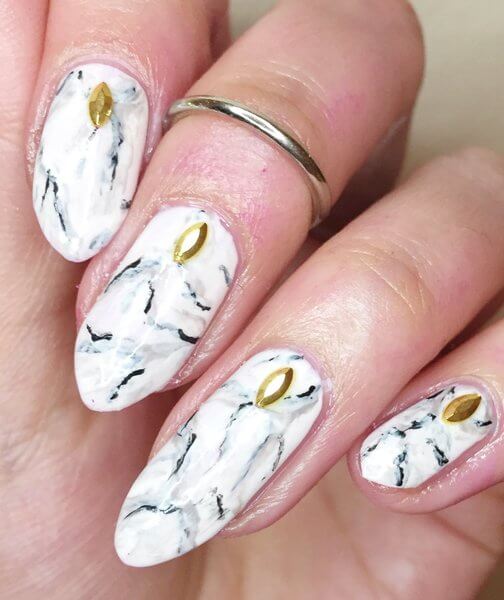
For an added touch I applied a gold rhinestone before sealing it all with topcoat as you know I like to be extra. Thanks for reading, I hope you liked these too! Any ideas on what stone to try next...? September is coming up...which also happens to be my birthday month with Sapphire as my gemstone! Maybe I'll try & throw something together for the occasion! :)
Lotsa love to ya!

No comments:
Post a Comment
I'd love to hear your comments & thoughts lovely people! They make me happy! :) Do check back as I will always do my best to reply back to you :) xoxo