
If you caught my post a while back on my Jade Nails, you'll know that I'm going through a bit of an obsession at attempting to recreate some of my favourite semi precious stones on to my nails! Girl be on a mission!
There really is SO much nail-spiration to be found in stones, each with their own unique eye catching formulation & pattern. I was so happy with how the Jade nails turned out that I was eager to continue on my journey, so today I've given a go at some Rose Quartz!

What do you think? Initially I WAS happy with how these came out, but the next day I asked everyone at work what they thought, only to reassure me & thankfully 90% DID guess accurately that they were meant to represent Rose Quartz! Because at the back of my head & the more often I looked closer at them I couldn't help but be reminded of human muscle...you know...like those diagrams in Science class remember? O_o Okay I've probably totally ruined this mani completely by confessing that...forget I said anything...here are my rose quartz nails....ROSE QUARTZ FOLKS!

For this I knew I would need a VERY sheer nude because your basically going to be layering here. I picked up this Essence Nail Candies polish in the shade Oh Lolli Lollipop quite some time ago so not sure if its still available but Barry M Nude is another sheer formula polish & a good substitute! I wish I'd picked up a few more of these Nail Candies as not only do they have a delicious fruity scent, but a really lovely formula which also hardens & protects the nails, dries fast & is super glossy to boot.

Start with applying one coat of your sheer nude polish.
Next I grabbed a white polish & with a fine nail art brush freehanded on to the nail some swiggly lines, making each nail a bit different in the direction of lines.
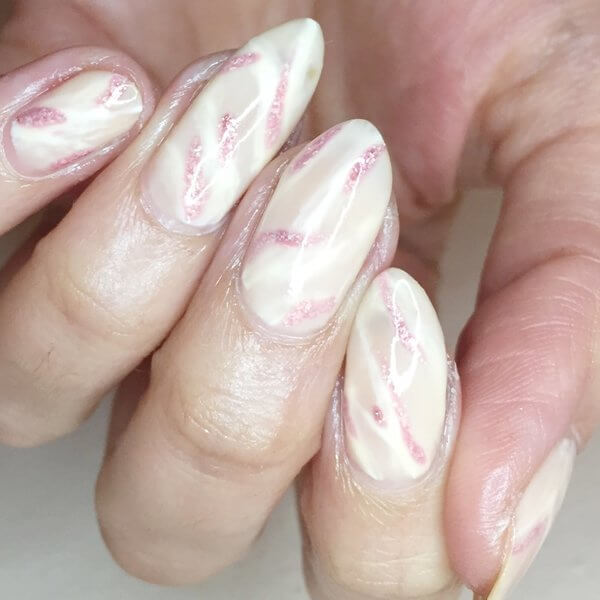
Now to create that marble effect, I dipped a brush into some acetone & lightly dabbed the brush along my white lines to make them fade & bleed into the base polish. I was quite light with my touch here, perhaps a bit too much as my lines are still quite prominent but hey....something to take note of for next time!

Next I applied another coat of the sheer nude polish.

For that semi precious sparkle, I grabbed this absolutely STUNNING pink holo glitter polish from ILNP called Daydreamer. Again using a fine nail art brush I added a few delicate lines along the white veins.

Finish with a final layer of the nude polish to encase the design. As there are a few layers going on here it did take a wee while to dry but a slick of topcoat helped speed things along!

And you have your Rose Quartz nails! Hope you liked them! Getting my thinking cap on now to see what stone I can recreate next....any ideas? Untll next time!
Lotsa love to ya!

No comments:
Post a Comment
I'd love to hear your comments & thoughts lovely people! They make me happy! :) Do check back as I will always do my best to reply back to you :) xoxo