7.30.2015

NOTD - Distressed Watercolour Chrome Nails

Hey there lovely readers! Oooh its been a wee while non? Work has been keeping one muchos busy of late, even with the occasional working weekend thrown in but its all going well so can't complain! :)

I'm all for discovering interesting nail art techniques to create funky manis with minimum effort. 
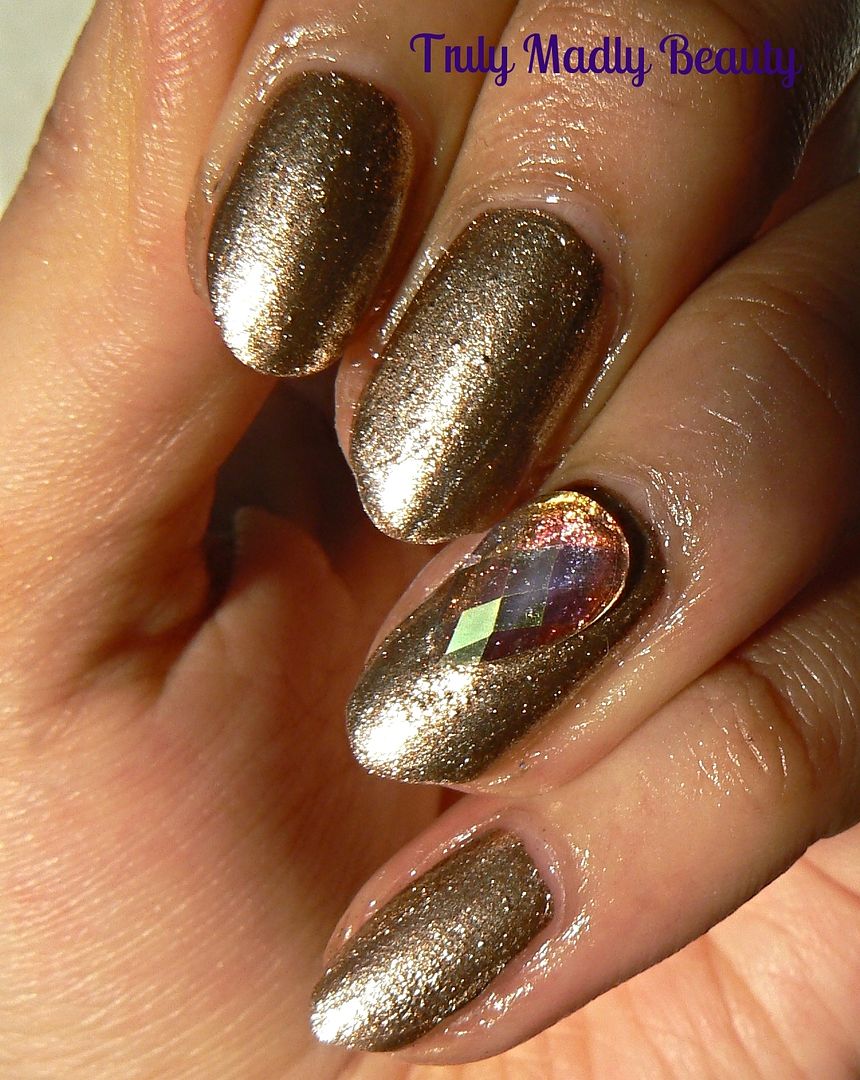
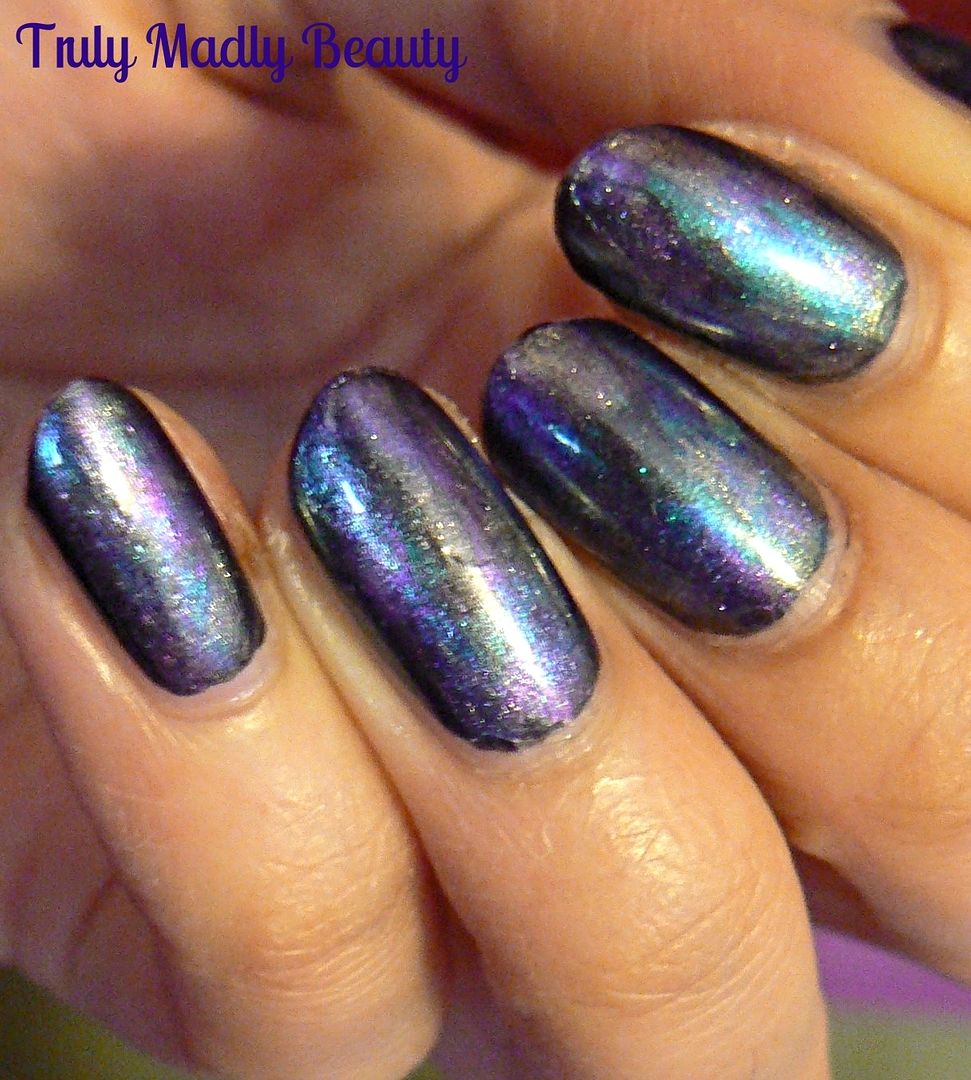
Today's manicure features one such technique called 'Distressed' nail art or the 'dry brush' technique that, if my memory serves me right, came about by the fab Sarah aka Chalkboard Nails. All that is involved is simply wiping off the excess polish on the brush, then applying quick strokes of polish across the nail to create the effect. This technique looks fab using black over neon however I wanted to try something a bit different so decided to use my Revlon Chrome Chameleon polishes to create this distressed watercolour effect... 


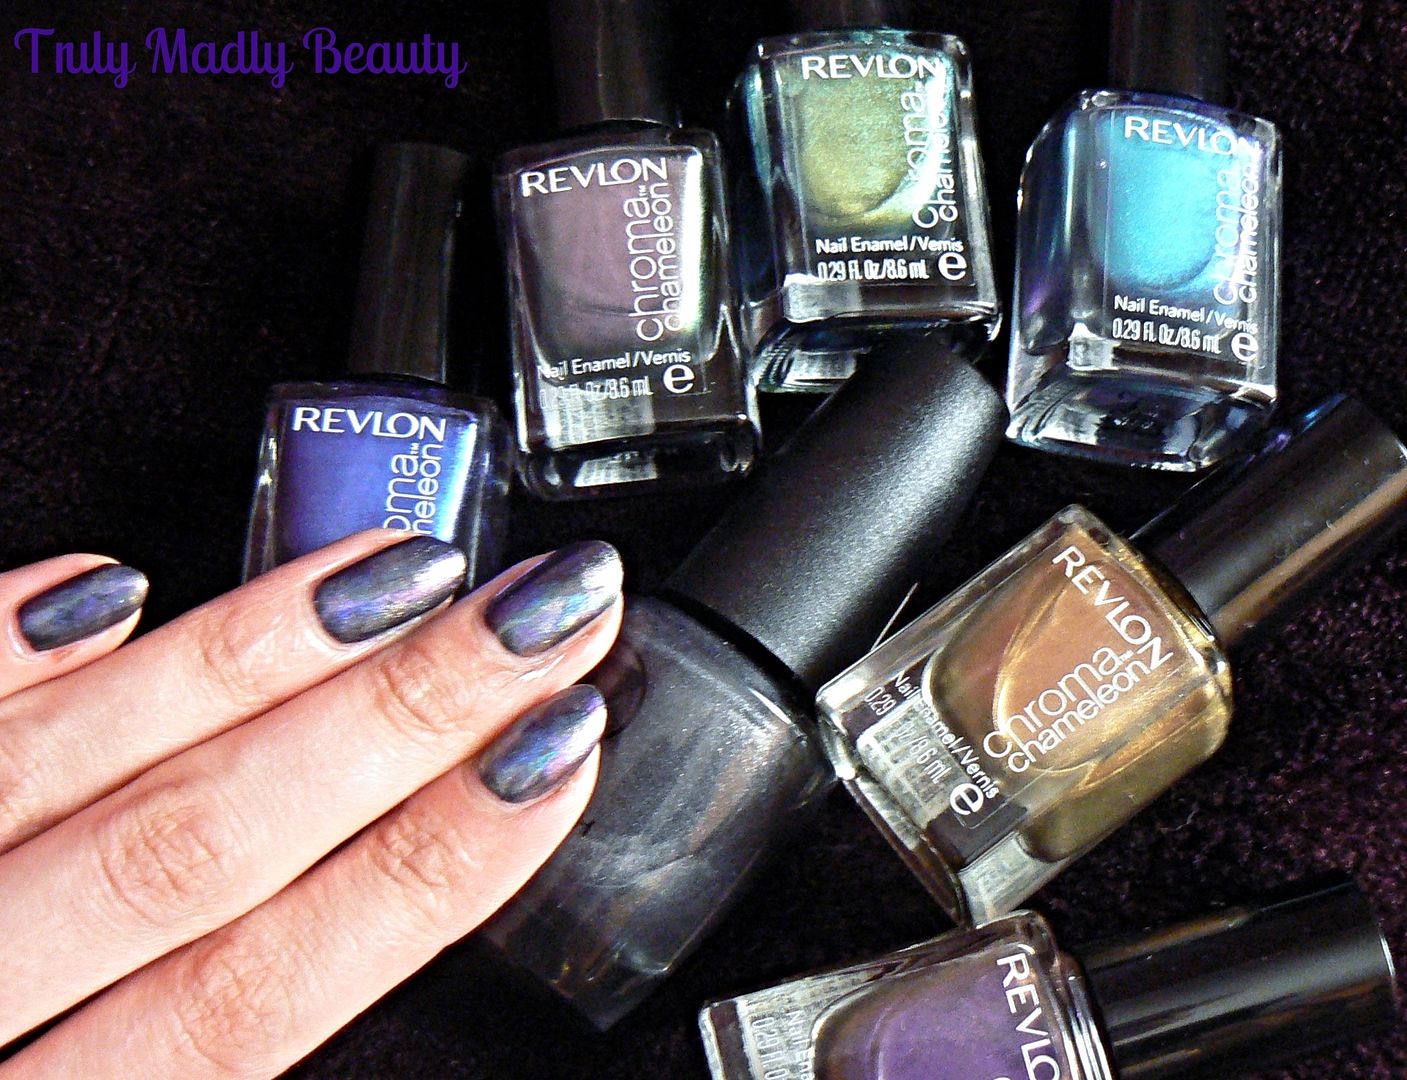
The Revlon Chrome Chameleon polishes were part of a limited edition collection a while back consisting of a range of pretty duo and multi chrome shades. I do love me a good chrome so you can imagine my delight when I found these babies in my fav little hunting ground, Poundland! I knew they all needed a good home therefore happily obliged in taking them with moi.


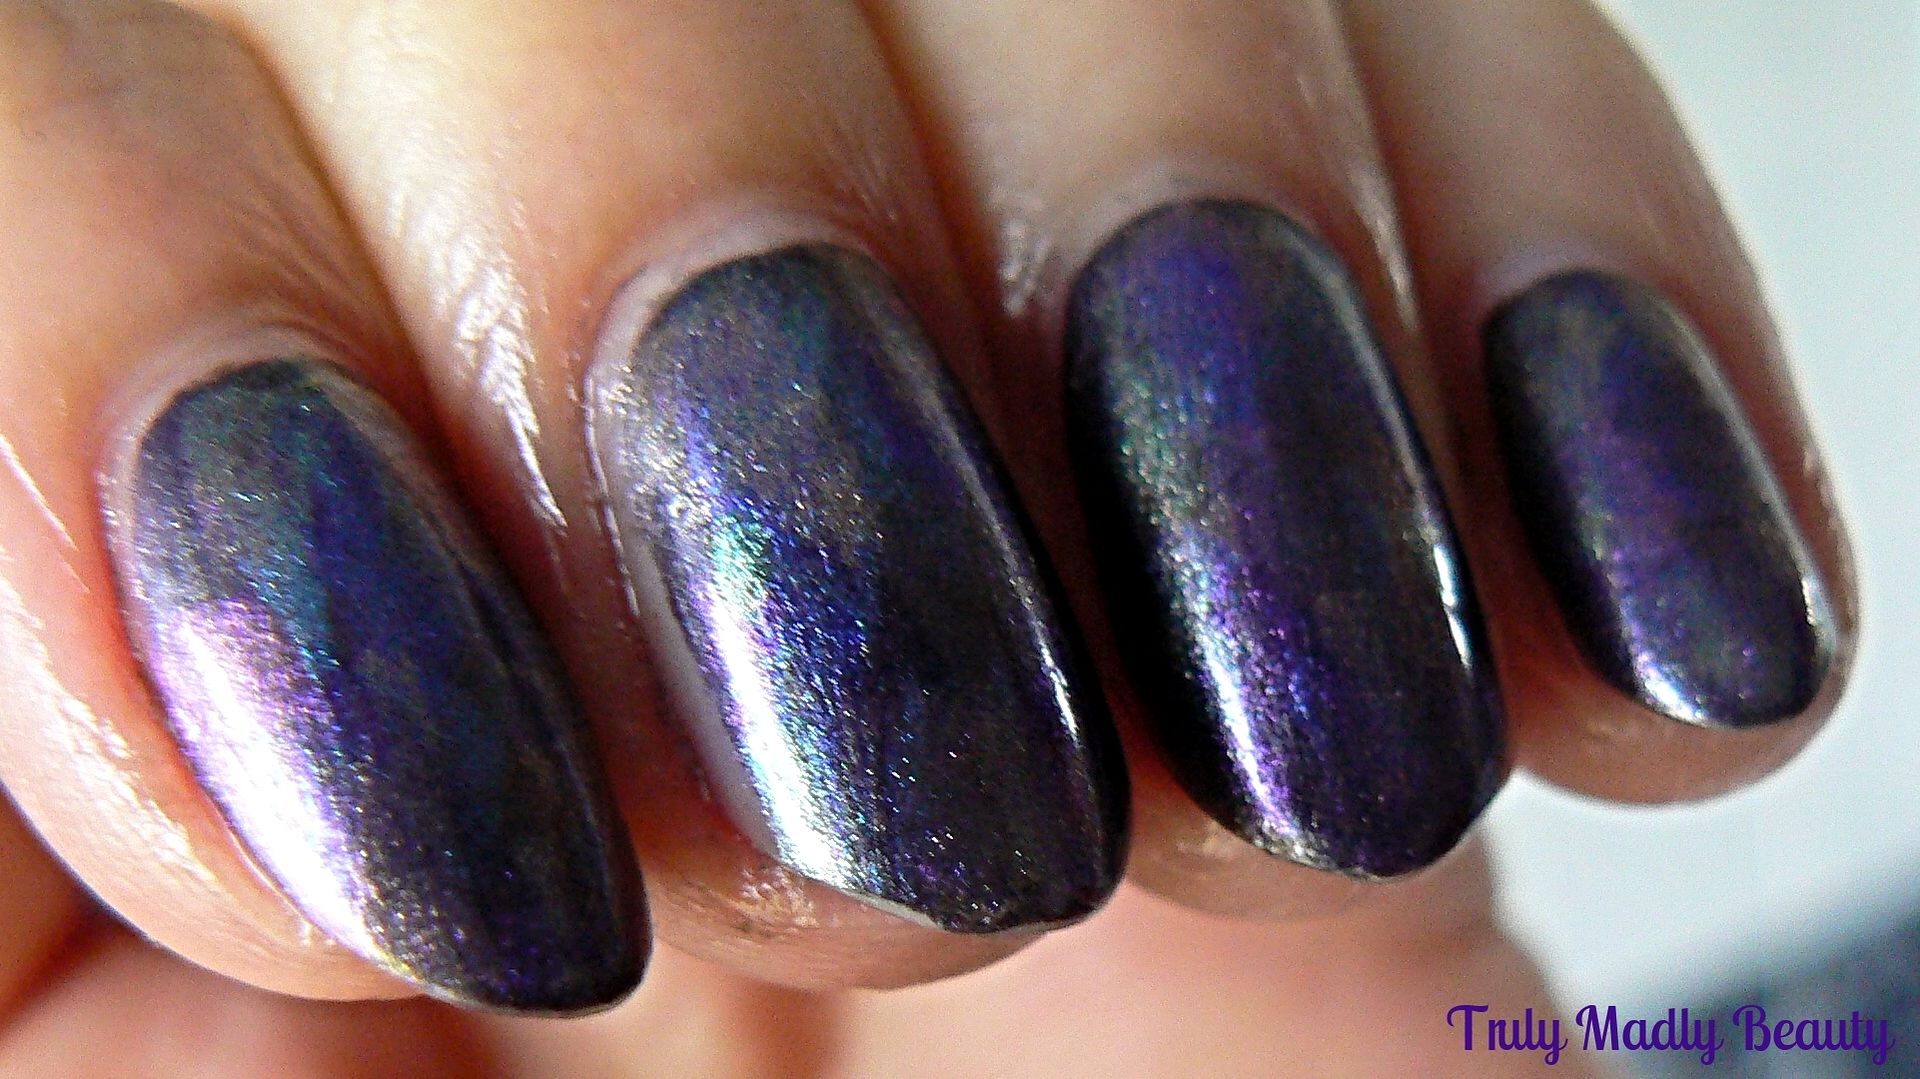
The shades I picked up were Cobalt, Aquamarine, Pink Quartz, Tanzanite, Amethyst & Topaz. Now whilst they look mighty pretty in the bottle, the formula of these chromes unfortunately wasn't all that great, quite sheer, therefore would definitely require a base colour underneath to bring out the chrome finish. So thought for this they'd be perfect to use with this technique & I loved the watercolour finish!


For my base, instead of Black, i decided to stick with the chrome theme & instead used a couple of coats of W7 Pewter, a sleek gunmetal grey metallic shade. 


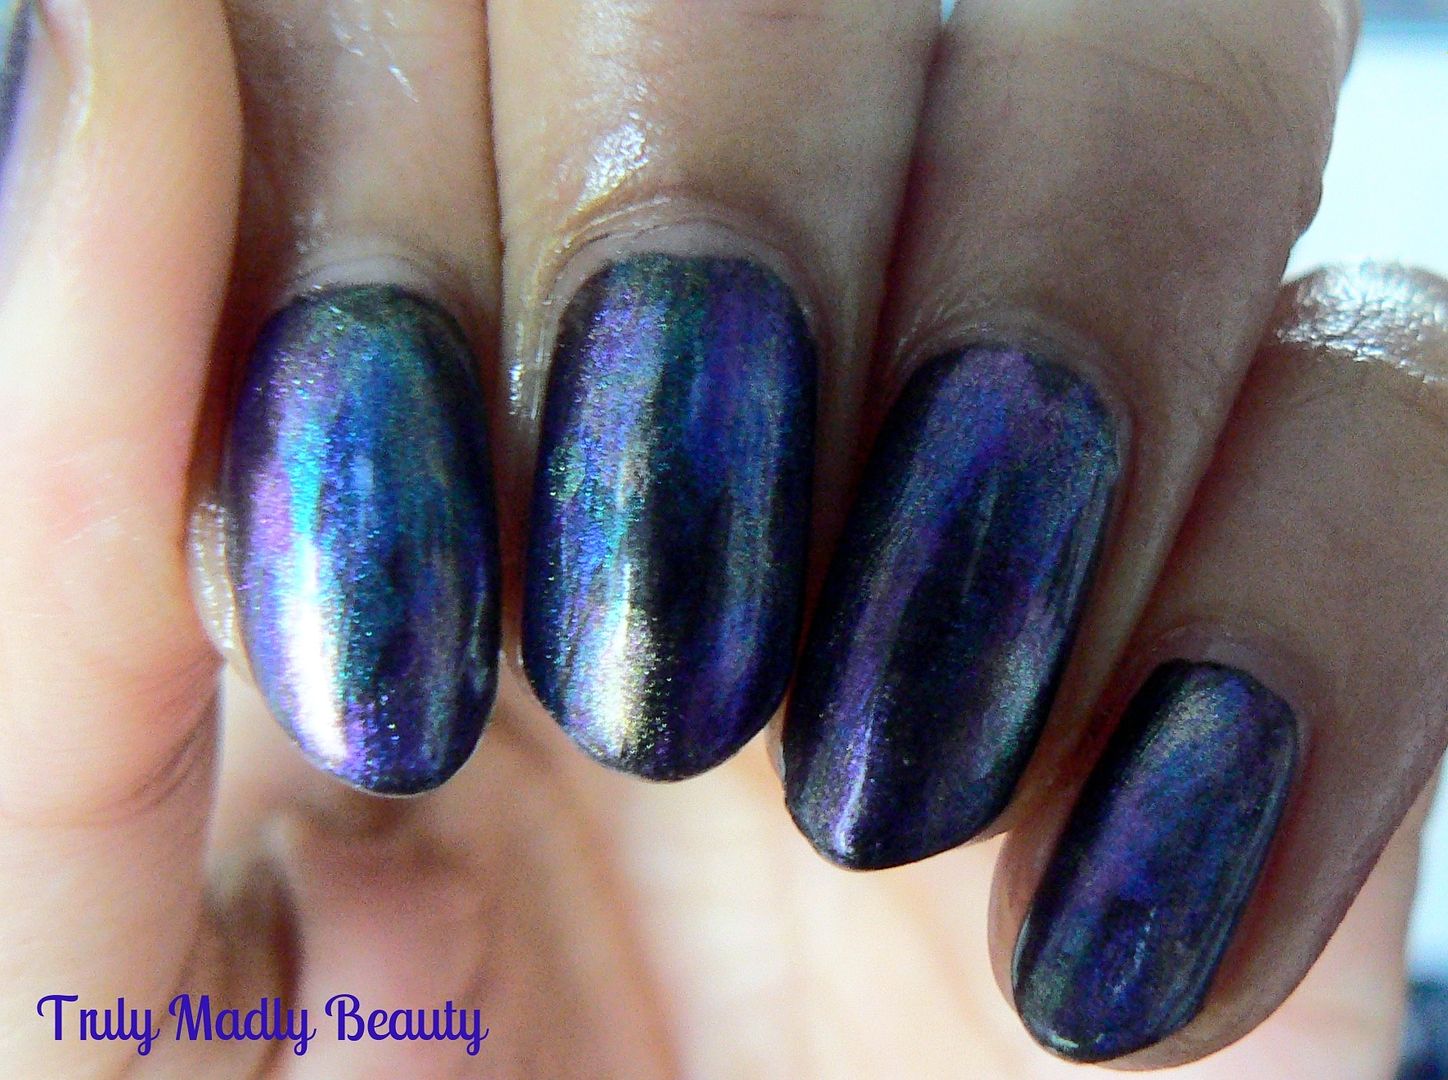
I then grabbed one polish at a time & after wiping off the excess polish on the edge of each bottle, simply applied quick strokes across the nail with the almost dry brush, adding quick light washes of colour.


With each shade I applied about 3-4 strokes, some horizontally down the nail, others vertically. By the time you've gone round all ten nails with one shade, the first hand should be dry already ready for the next shade. And even if its not then no big deal as the whole point of this look is to mix & merge the tones!


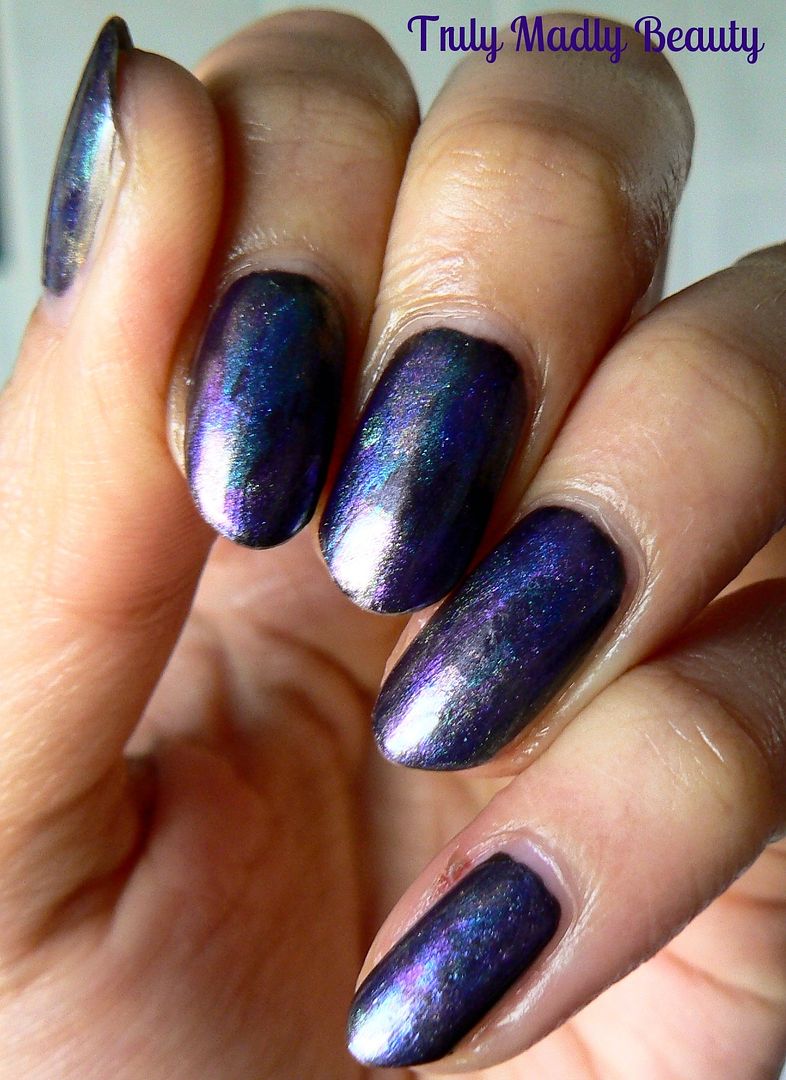
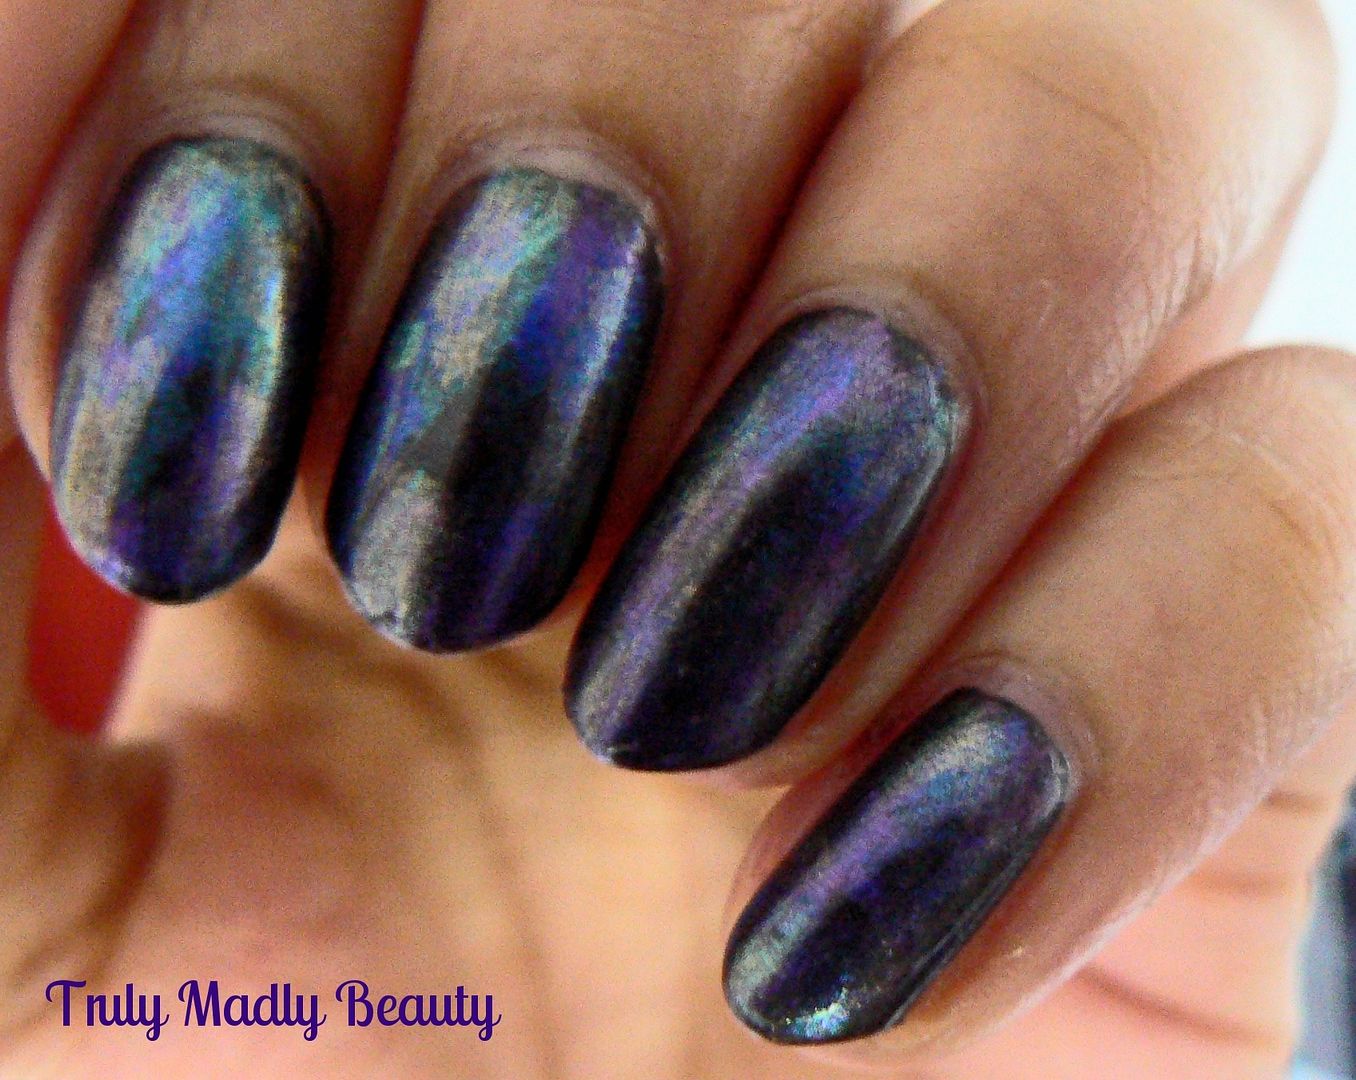
I love this technique as you can have fun with the colours & directions of your brush stroke & just pile on shade after shade to create this fab effect with interesting results! I will definitely be giving this a try with black polish over a bright neon! Or maybe some fiery orange/red duochromes...

Hope you liked the mani darlings! Thanks as always for reading!

Lotsa love to ya!


7.20.2015

Pretty Bling from Cheap Frills!

Hello there my lovely readers!

I hope your weeks gotten off to a good start! Truly did not want to return to work after a blissful weekend spent with family on Saturday for Eid, followed by a divine day perusing my favourite place on Earth, Brighton! I got to meet up with the lovely Jayne whilst there also which was the cherry on top of an ace weekend :)

Just one of the many wonderful things I love about the world of Twitter (come find me @Aysh_tmb) is it often brings you into contact with many incredibly talented independent jewellery businesses that I wouldn't know existed otherwise.


I've already become addicted to a number of boutiques which produce some stunning pieces. One that I have a soft spot for in particular is Cheap Frills, which is run by the lovely Georgie, who actually resides in Brighton the lucky thing, not jelly at all, & has such a delightful selection of pretty vintage bling. I thought I'd share with you beauts a few bits & bobs I've picked up from this store which has become a firm fav of mine...


One of the first items I ever purchased after having a browse through all the delightful wares on offer was this adorable golden bee & amber stone necklace...isn't it so puuuurdy?


First things first though I absolutely adored how the necklace came packaged when it arrived. Each piece is parceled inside a cute paper bag & sealed with wax & a Cheap Frills stamp embossment which I thought to be so quaint & its little touches like this that really endear me to a product!


The necklace itself is exceptionally pretty with the delicate gold chain, intricately detailed solid bee pendant & the pretty amber heart stone to complete the whole piece. Now in reality bees actually scare the beejesus (pun totally intended...sorry) out of me. However in jewellery form...no such problems. Weird.


Another couple of pieces I couldn't resist hauling a little later on were these super cute silver arrow earrings & swallows nest necklace which came with it. These pretty items of bling have all gotten a lot of usage!


Lovely right?  I definitely urge you to check out Cheap Frills if you're looking for pretty cameo jewellery & accessories. I already have my eye on the Oxblood Vintage Cocktail Ring! Unfortunately I don't think the Bee & Amber necklace is available any more (I did get it a while back!) however Georgie is forever introducing new equally stunning pieces & FYI there's always some fab bling around Halloween time so defo worth keeping an eye out!

Thanks as always for reading lovelies! Till next time.

Lotsa love to ya!


7.18.2015

NOTD - Cuticle Tattoo Henna Style Nails

Hey there lovely readers! Hope you're enjoying this glorious weekend & a happy Eid to all who have been celebrating these past two days.

There's a trend on the nail scene that's recently caught my radar of late & tis one I am LOOOOVING muchly! What is it I hear you ask? Cuticle Tattoos!


I'm sure you're familiar with the pretty metallic tattoos that have been hitting the festival scene, which has had everyone go ga ga over. A fun way of adding a bit of glam to any ensemble, well why not add a bit of glam to the nails too?!


I adore henna body art, growing up in an Asian household, henna is something I'm pretty familiar with, always loving some sort of pretty design for weddings, events etc. One of the things about henna though, despite the pungent smell that puts a lot of people off, once the design starts fading on your skin, it definitely loses some of its prettiness! When I go for designs, I always prefer something simple yet elegant which is why I heart these cuticle tattoos from Charlies Nail Art store with their black henna like vibe.


You may recall me mention Charlies NailArt store a few times on here already, lets just say I am thoroughly addicted to this online store for bargain nail art supplies, the cuticle tattoos being one of them. There are a variety of different designs to choose from, each as pretty as the other & they really are a unique way of adding a bit of extra wow factor to your nails, making the mani look so much more interesting. Not to mention they're super simple & straightforward to use!


I wanted the focus to be on the cuticle tattoos so decided to go for a nude pink mani using Wet N Wild Private Viewing which I picked up in NYC earlier this year. I adore this, its like the PERFECT nude! The formula was a tad runny, however the brushes on these are fab, making application a piece of cake. I applied two coats before doing a straightforward design by applying a few strategically placed lines with my Models Own nail art pen in Black.


Once my mani was dry, it was time to apply the tats! You get a sheet of twenty cuticle tattoos of various sizes, so its easy to match up against your nail. Remember those temporary tattoos you used to wear as a wee one making you feel like the coolest kid on the block? Well these work in the exact same way. Simply cut around the tattoo you will be using, peel of the clear film & place tattoo facing down just below the cuticle.


Then using a wet cotton pad, press down firmly for about 20-30 seconds & the paper should slide right off & away leaving the pretty design on the skin.


I discovered as I went along that its much better to cut as close to the design as you can as this makes placement much easier! Lets just say that the positioning on the first hand was way off as you can see haha! But practice makes perfect & even if you don't get it directly by the cuticle, it still looks great!


Now these really are temporary, you can get a good days wear before they start to noticeably peel away from the skin & when they do, just simply peel off the remainder, which comes away very easily.


Charlies Nail Art store have a variety of lovely designs to choose from & for the absolute bargainous price of just £1.25 how can you resist? I definitely can't & I predict another nail art haul happening in the not too distant future!


Hope you liked the mani dolls! Thanks as always for reading! 

Lotsa love to ya!


7.09.2015

NOTD - Heirlom by True Brit London

Hello there my lovely readers! 

So the time has come to share with you the final polish from the brand True Brit London! I hope you've been enjoying these shades as much as I've had swatching them! As mentioned, its definitely a case of saving the best till last as this one is pretty special. Without further ado, here is the simply divine Heirloom from the Luxury Collection...


Luxurious indeed *swooooooons* what did I tell you? Its a stunner right? And being a huge fan of pretty much EVERYTHING rose gold this is definitely a winner for moi & a must have shade for my fellow rose gold lovers! 


Heirloom is another beautiful metallic foil like Knightsbridge, however this little gem has the loveliest delicate Rose Gold hue running through it, resulting in a truly elegant looking manicure. The pretty pink champagne like shade is one that would suit all skin tones.


Application was lovely over the Caviar Base Coat & you could actually get away with just one coat, however you know me! Two coats left a gorgeously opaque mirror like finish. 


I can never resist adding a little something extra to my mani's but didn't want to draw the focus away from the Rose Gold prettiness, so applied a sparkly teardrop gem to the ring finger from Charlie's Nail Art store, isn't it lovely? With just the right amount of sparkle to satisfy my magpie tendencies, it adds a lovely touch of 3D glamour to a mani, j'adore!


With foils, you can normally forgo the topcoat, but for longevity I like to apply it anyway. Plus the True Brit London Gloss Topcoat is a thick formula, making it perfect for sticking on gems & charms! You do need to be patient with this topcoat & let it dry fully before carrying out your day to day activities!


So there you have it! Four delightful offerings from True Brit London; Cream Tea, Knightsbridge, Lady Penelope & Heirloom. Overall I thinks its obvious my thoughts on this new brand to hit the nail polish world. Not only am I impressed with the quality of the polishes, but I simply love the innovative & quintessentially British themes incorporated within the collections making it a unique, fun & interesting range. I do love a pretty bottle too so packaging gets a big thumbs up!          


The True Brit London polishes are all 6-free formula, so no harsh chemicals plus include goodness in the form of Vitamin E, Elderflower & Rose Extract. You're definitely getting high quality here without the hefty price tag. I'm excited to see some new collections have been added to the range which can all be found & purchased online for £12.50. If you use my code Truly10 you can get an extra 10% off, so what are you waiting for dolls? 

Thanks as always for reading!

Lotsa love to ya!  

Disclaimer - * products featured were sent to me for my consideration. I am not affiliated with the brand nor paid for this post, this review has been as always my 100% honest opinion! :)

7.05.2015

NOTD - Wimbledon Nails!

Hey there lovely readers!

Unless you've been hibernating the past week, you'll be aware that we are currently in Wimbledon season here in the UK. ALL THE STRAWBERRIES!!...oh & erm tennis. Now I'll put my hands up & say that I'm not the sportiest person on the planet...now if napping was a sport...heck I'd be a gold medalist guaranteed. However one can't help but get in to the spirit of it all & y'all know by now my favourite way of doing so! A friend of mine requested a mani suitable for this tennis event so here we go!


Tennis balls! :) I did think about incorporating a few strawberries in to the mani but didn't want to over do it haha! Especially with all the vibrant neon action, not to mention the fur effect accent nail experimentation I decided to go for...


For my base I used two coats of Models Own Flip Flop from the Polish For Tans collection. At first I was unsure of this vibrant neon green shade, however on application it was simply perfect for my tennis balls! I'd forgotten just HOW beautifully bright it was...I was tempted to dig out the shades! :)


On top of Flip Flop I applied a coat of Funky by Claire's. Pretty perfect name for this fun green tinted topper with small & large hexagonal glitters suspended in the formula. I love using this over greens to add extra dimension.


Then using the striper brush end of my Models Own nail art pen in White, I simply freehanded the two circular curved lines to finish the tennis ball design!


The accent nail was a little experiment & I'm pretty happy with how it came out! I wanted to create a real tennis ball effect & whilst browsing through Poundland found a random double ended polish witch had polish on one end & the green fur effects on the other.


I only picked it up for the fur effects, the polish was pretty rubbish so into the bin that went! Instead I used the Models Own Flip Flop. Placing a couple of french mani guides to create the negative space curves, I applied a thick coat over the nail, before covering with the fur whilst the polish was still wet, patting down to make sure it stuck well!


Once I was happy with the amount of fur on the nail, I removed the guides & then placed some white pearls along the negative space to create the tennis ball design. Obviously I didn't topcoat the accent nails, but the others got a good dose of CND Air Dry!

I hope you liked the Wimbledon inspired nails my lovelies! Thanks for reading!

Lotsa love to ya!


7.04.2015

Buffed & Polished Nails in Seconds with Micro Nail Electric Nail Polisher!

Hello lovely readers! Hope you're all having a lovely weekend!

This latest post involves me doing something that is dreaded a wee bit by most nail bloggers (or maybe its just me!) Today I will be sharing with you my BARE nekkid nails O_o *cue soap opera style dramatic crescendo*

Okay maybe I'm exaggerating a tad & its not quite the crisis situation, but for someone who wears polish pretty much 24-7, I do feel naked without! However in the name of blogging I shall brave it as today I'll be touching on the subject of nail buffing & on this nifty little contraption in particular that makes the whole step mess free & straightforward...the *Micro Nail Electronic Nail Polisher


I'm ashamed to admit but when it comes to nail care, I've only really started paying attention to my nubbins *hangs head in shame* This includes all aspects; moisturising, scrubbing, cuticle care, buffing. Thankfully, my nails aren't in that bad condition, maybe I saved them just in time haha! One thing I have suffered from however is bumpy/ridged surfaces with the occasional flaking due to my calcium deficiency which can result in an uneven finish to a mani, despite base-coating,  very frustrating!  


Buffing can help with this & is a step of the nail care routine that is recommended every couple of weeks ONLY, any more then you can risk damaging your nails! I'm sure you're familiar with buffing blocks that are available in the nail care section of most beauty stores. The Micro Nail works in the same way, the benefit of it being that you not only have your nails buffed but super polished & shiny with minimum dusty mess within seconds. Easy peasy lemon squeezy. Oh & did I mention it was PINK?? ;) 


The MicroNail is battery operated & comes with two attachments. A grey roller which is the buffer & a white roller which does the polishing. You get two of each & attaching the rollers to the device is super easy. Just pull off the grey buffer roll when done buffing & push on the white roll for polishing.


It is recommended to use the buffer on the surface of the nail, not pressing too hard for about two seconds per nail. Just switch the Micro Nail on by pushing up the button, glide the roller over the nail surface for 2 seconds or until you notice the surface has smoothed out nicely. So here we go with a before pic for you of my natural nails...o_O


After buffing all ten nails, switch to the white roller & go back & polish up those nubbins! I was super impressed with not only how quickly, all ten nails were buffed & polished with minimal mess but the finish of my nails was SO good,...I actually didn't wear polish for the rest of the day....and that my dears is BIG ;) Here's the obligatory after pics...  


After using the MicroNail you are left with nails that look in healthy condition & salon treated with their glossy finish. I also noticed later on when I applied polish (of course I gave in eventually) that it glided onto the nail beautifully & left a lovely smooth surfaced finish. 


So there you have it, a device which has proven that it does actually give results & isn't just a gimmick like so many others out there. My mother has already "borrowed" it many times, which reminds me I need to go hunt it down!  


The device can be used on both hands & feet, for when your doing a pedicure & would be perfect for those who wish to have salon finish nails but perhaps cannot wear polish for work or simply prefer that simple clean manicured look! 

The MicroNail retails for £39.99 & is available online. However Boots currently have it on offer for £29.99 & if that couldn't be topped... lookfantastic have it for a bargainous £19.99 right now! Almost half price!

Thanks as always for reading dolls! 

Lotsa love to ya!


Disclaimer - * products featured were sent to me for my consideration. I am not affiliated with the brand nor paid for this post, this review has been as always my 100% honest opinion! :)