
Taking a wee reprieve from Halloween Nail Art for the moment (not for long though!) as I really wanted to share this mani with you!
You may remember the stunning Chameleon Flakies I reviewed a few posts back from Beauty Big Bang? These little pots of wonderfully magical flakes transform an ordinary polish into a stunningly ethereal multichrome flakie finish.

Each shade has a different colour shift effect, the J2443-3A flakies, when applied over a dark polish, gave a stunning purple to green colour shift, have a peek at my post HERE to see how pretty it is. Well naturally I was eager to see how the other shade I picked J2443-4A would fare so couldn't wait to give it a try & this time, keeping in with the dragon theme I decided to use it as the perfect base to create me some Dragon Egg Nails!

And I've done a step by step tutorial for you to show you how you can create this Dragon Egg pattern too! But...before we go on to that, lets just first take a moment to appreciate the stunning finish that the J2443-4A flakies give, this time a fiery burnt orange to green shift...*swoons*

Instead of using black I used a different dark polish in my stash, Urban Decay's Blackheart.

Whilst looking rather meh in the bottle, though I have to say the bottle itself is bloomin gorgeous, Blackheart is actually an amazing shade, so very unique! A cool grey brown filled with purple & gold shimmer giving it a duochrome finish, it truly is an interesting one & I love it! So much so that I had to keep one nail free of the flakie just to appreciate it. Two coats gave a smooth opaque finish & for this accent nail I applied a row of pretty rhinestones from Born Pretty Store

Applying two thin coats of Blackheart to all the other nails, I waited a wee bit until the polish was almost dry but still a bit tacky, then using the sponge applicator that comes with the flakies, slowly dabbed them on to each nail, before then going in with my finger to swoop up and down until the whole nail becomes a satisfyingly fiery green flakie sensation!

Once all my nails were nicely chromed up I then grabbed my trusty nail art brush & some black polish & got started with creating my dragon egg pattern which is easier to do than you might think.
Start with applying a V at the top of the nail by the cuticle in the centre, like so...
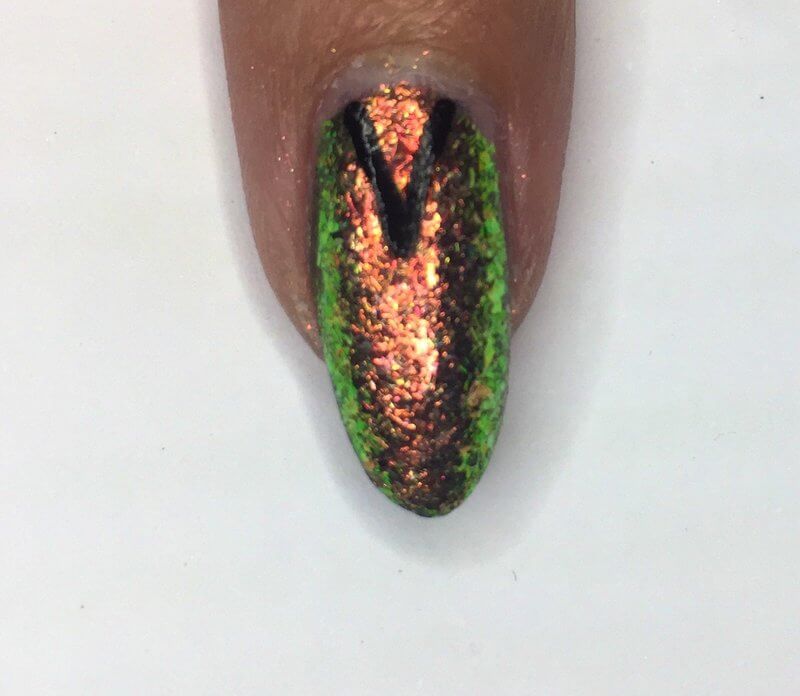
Then draw on two more V's either side the centre V, position them slightly lower so that the top of these V's hit the middle of the outer edge of your first V...

Next add on another V in the middle of these two V's, directly below your first V....

Now basically repeat this process again with the two V's either side...

And again with the middle V...

Just follow this same sequence until you hit the tip of your nail...

Finish with a coat of topcoat & you are done! Hope I explained that okay loves though hopefully the pics help & are pretty self explanatory too :)

I think its safe to say I'm pretty gaga over these Chameleon Flakies from Beauty Big Bang & I will definitely be doing another haul in the not too distant future to try some more of the shades.
They are currently on offer at the moment too for just $2.99 so what are you waiting for? Go snap some up & have some Dragon fun on your nails! Thanks as always for reading!
Lotsa love to ya!

These Flakies are stunning and I love the way you’ve used them. Gorgeous gorgeous mani and your nails are absolute goals!
ReplyDeleteVicky x
@thepolishlist
Thank you so much Vicky, you NEED these! I'm obsessed with them haha. Aww thank you you're such a sweetheart! <3 xoxo
Delete