
I stumbled across this post in my archives which I'd written as a guest post donkeys ago for the lovely Safiyah who kindly sent over to me the Models Own SoFly collection to review for her, where I also shared a few super quick nail art looks. In case you missed it I thought I'd whack it on here as well for your perusal as the easy peasy nail art is my favourite kind! :)

Models Own have impressed me mightily with their polish game over the years, they have in the past held true as one of my favourite brands however I did feel of late, a lot of the collections released were a tad samey samey. Well I needn't have feared as Models Own came back into the game guns blazing, rolling out some ace collections including the mythical Celestial range, the bright & bold Aquaproof polishes & the stellar SoFly collection which I'll be sharing with you today which was MO'S collaboration with the one & only nail slash street artist Sophy Robson & the polish offerings did not disappoint.

Can we just take a moment to admire the gorgeous packaging of these polishes? The gemstone golden lids embossed with the SoFly logo are stunning & probably reason enough for me to go gaga for this range. But of course, its whats inside that counts & the Sofly collection offers an eclectic mix of four beautifully pigmented shades plus a glitter. I've paired each of the polishes with the glitter topper on an accent nail to show you you how it looks on each shade & I've also thrown together some super easy nail art looks for you to recreate too using just a dotting tool so lets mosey on!

When it came to which polish would be getting first dibs it was definitely going to be Flylac. I'm an absolute sucker for lilac shades & Flylac delivers on this & then some. A gorgeous pink toned lilac creme, Flylac has the prettiest soft silver microshimmer running through giving it a subtle iridescent edge. This was two coats applied smoothly for an opaque finish. I've applied one coat of Spray My Name on my ring finger which is the glitter in this collection & a fun mix of white & pink hexagonal glitters that I kinda dig as I have nothing like it in my stash.
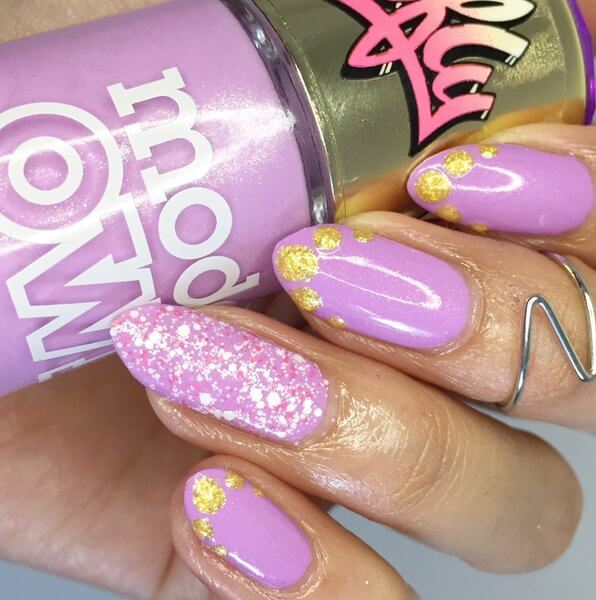
For my first easy nail art look I've used the gold shade from the collection, Bullion Bling & with my dotting tool simply applied 5 dots along the tips for a dotted french look. Start with placing a large dot in the centre before adding two more either side, gradually making the dots smaller. Simples!

Next up we have Girl Gang which is Flylac's sister shade in this collection if you will, another gorgeous creme, this one is a beaut candy pink shade & is paired with a divine golden microshimmer running through it this time. This is two coats applied with one coat of Spray My Name again on the ring finger.

For my second nail art look, grabbing the gold & my trusty dotting tool again, I've simply applied three dots in descending size by the cuticles, before finishing with topcoat & you're done! I wasn't kidding when I said these were quick & easy huh? ;)

Now its the vampy one in the collections turn, Vandal is a cherry red colour, very retro chic. Here I've applied two coats but even so I could still see a visible nail line so 3 should give you full coverage. I stuck with two because I'm a stickler for habit...& perhaps just a lazy sod. I also LOVE how Spray My Name looks on top of Vandal!

For the third nail art look yup we're using the gold again, this time using the dotting tool to create some cute flowers. Simply place your dot where you want your flower(s) to be & then add 5 more dots around it. Fit on as many or as few as you like, here I've stuck with two on each nail.

And last but by no means here is the gold we've been using for our nail art, Bullion Bling in all its golden glory. The formula of this shade is actually on the sheer side, so I did have to overcome my lazy bum-ness & go in with three thin coats here, but boy was it worth it, look at that bling!

Spray My Name also looks lush on top of the gold. I didn't want to distract from the metallic goodness of Bullion Bling so sidestepped doing any nail art on this one.
Such LUSH shades don't you think?! All the polishes applied beautifully down to the quality of the formulations & the brush itself, I honestly cannot fault them.
I hope you liked these easy nail art designs, let me know if you give them a try! Stay tuned for my next post where I'll show you how to create some awesome leopard print nails with one of these fab shades in a step by step pictorial...its been a while since we've had one of those eh? :)
Lotsa love to ya!

Disclaimer - * products featured were sent to me for my consideration. I am not affiliated with the brand nor paid for this post, this review has been as always my 100% honest opinion! :)
No comments:
Post a Comment
I'd love to hear your comments & thoughts lovely people! They make me happy! :) Do check back as I will always do my best to reply back to you :) xoxo