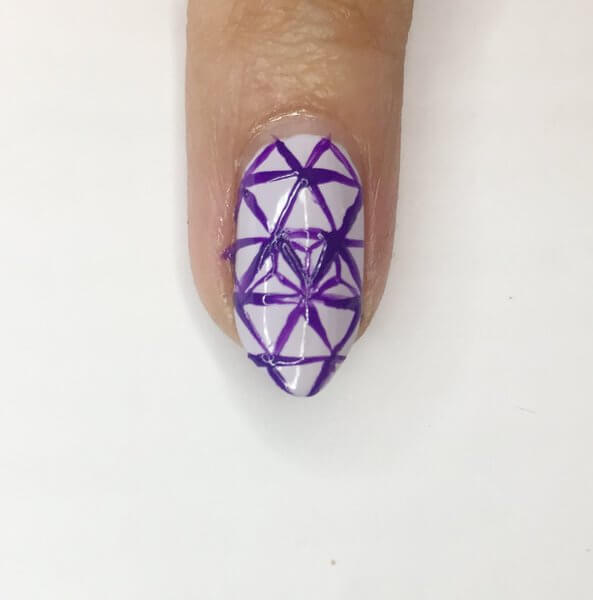
Oooh its been a while since I've had the time to do a proper step by step nail art tutorial for you guys so I thought it was high time to rectify that & boy am I coming at you today with a banger of a one!
This intricate kaleidoscope like nail art pattern is called Asa No Ha & may look incredibly complicated yes? Would you believe it was done freehand? No stamping here missy! I first came across this nail art design by the super talented Very Emily, who sadly no longer blogs but was the source of much nail inspiration for me.
I saw this look of hers & was completely inspired to recreate it following her tutorial. I loved the design so much that I wanted to share it with you as well to show you that with a bit of patience...its not difficult to achieve at all!
Asa No Ha is a stunning geometric pattern named after the Asa hemp plant, associated with Japanese culture & can often be seen on various clothing's & kimonos. I'm finding myself being inspired more & more by intricate detailed patterns so I was eager to give this look a go! Seeing the Asa No Ha pattern slowly come together on the nails was mesmerizing! :)
You can of course use any colours you fancy, one light & one dark of the same spectrum works best in my opinion, for this mani I followed Emily's footsteps & used purple tones. LaLaLa Lilac by Accessorize for the base & Primark Grape Soda for my pattern. So how to create this amazing eye catching design? Without further ado lets get started!
Start with applying your lighter base colour, this is two coats of the LaLaLa Lilac, a gorgeous pale purple lavender creme...
Now you need your super fine nail art brush & the darker shade to start drawing on the pattern. I used my Roubloff Ju Bilej brushes which are a Russian brand, however these can be difficult to get hold of, I managed to find a seller on Etsy HERE but for a good alternative I would highly recommend SoNailicious nail art brushes as they are fab quality & easier to get hold of! Begin with applying 3 tiny dots to the centre of the nail...
Join these dots, which act as a sort of guideline, to make a triangle...
Next, add on another triangle, facing the opposite way, on top of the first triangle...
Then add two more triangles either side of this to create a pyramid like so...
Continue adding on triangles along the row, side, by side, rather like a zig zag like pattern until you've completed the whole row & continue doing this in rows until you have covered the whole nail.
Now at this point...I've actually switched fingers can ya tell? Haha! I realized the first nail I did, which was my pointer finger, my lines were WAY too thick. But I managed to rectify this on the other nails. You can see why its crucial to have a fine nail art brush!
Once your nail is covered in the triangle pattern, we can now go in & make that Asa No Ha design come out! To do this, inside each of the triangles, place a dot in the centre, then from that centre dot, draw 3 fine lines coming out, to hit the points of each triangle, a bit like a windmill...
Carry on doing this inside each of the triangles & slowly...you'll eventually end up with this...
Ta da! Asa No Ha Nails! Just forgive me the dud pointer finger fail!
Now I won't lie...this design DID take a bit of time & patience...but the end result is so completely worth it! The key is just go slowly and take your time with each stage.
I waited 5-10 minutes before applying topcoat to finish as heck I didn't want to risk smudging all that work!
I cannot wait to recreate this design again in a rainbow spectrum of shades! I hope you liked these too & found the tutorial helpful, do let me know if you give them a try!
Thanks as always for reading!
Lotsa love to ya!


No comments:
Post a Comment
I'd love to hear your comments & thoughts lovely people! They make me happy! :) Do check back as I will always do my best to reply back to you :) xoxo